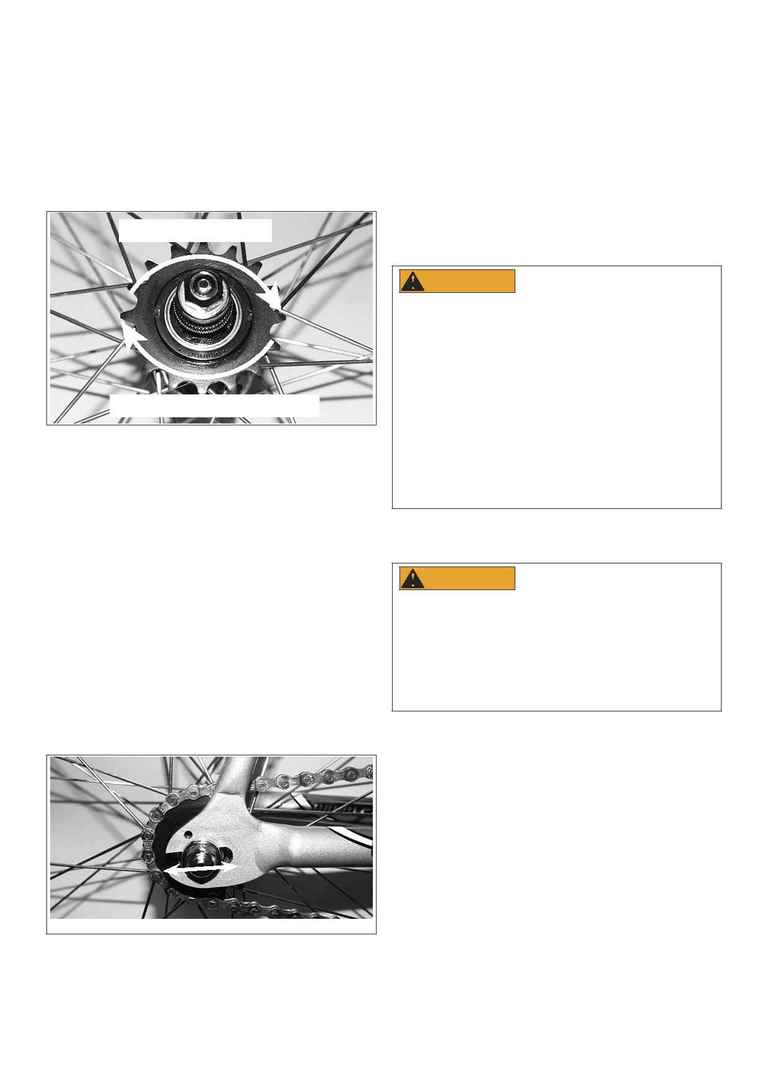
CHANGING THE REAR COG
Track bikes have a fixed gear--One set gear ratio, no freewheeling,
and no coasting. Track racers change cogs or chainrings to alter
gearing. The cog is threaded onto threads on the rear hub in a
clockwise (standard right hand thread) direction. A lock ring with
counter clockwise (left hand) thread is used to retain the cog and
resist backpedaling force. See Fig. 1. A cog remover / chain whip
tool is used to tighten the cog, and a lock ring "hook" spanner/lock
ring spanner wrench is used to tighten the lock ring. You will need
tools specifically made to fit your components.
Figure 1
CHAIN TENSION ADJUSTMENT AND INSTALLATION OF
THE REAR WHEEL
When the cog (or the chainring) is changed in size, the chain
tension will need to be adjusted, as there is no rear derailleur to
take up or release excess chain. On a track bike the chain tension
is set by moving the rear hub back and forth in the slotted, "track"
rear dropouts. This track bicycle is equipped with track wheels and
hubs. These hubs are equipped with axle nuts, not quick release
mechanisms.
Before changes to the cog and/or chainring are made, the rear
wheel axle nuts must be loosened and the rear wheel removed.
Once the the cog and/or chainring is changed per the component
manufacturer's instructions, the chain tension must be set. This is
done by sliding the rear wheel back and forth in the dropouts until
the chain tension is correct and the wheel is centered between
the seat stays and the chain stays. See Fig. 2. The chain tension is
correct when there is approximately 1.0 1.5cm of vertical chain
deflection between the chainring and rear cog.
Figure 2
Note that a major gearing change may necessitate adding or
removing links of chain. If you are not familiar with this operation
or do not have the proper tools to perform this service, please take
your bicycle to your Cannondale retailer. The chain length must be
such that the axle nuts will fully contact the slotted dropouts.
Once the correct chain tension and wheel position are found, the
nuts should be tightened to 240 In-Lbs (27 Nm). Tighten by holding
one nut with a wrench while tightening the other with a torque
wrench. Switch the tools to the other side and repeat.
INSTALLATION OF THE FRONT WHEEL
This track bicycle has a track front wheel equipped with axle nuts,
not a quick release mechanism. The front wheel must be properly
installed. To install the front wheel, first be sure the hub axle is all
the way up into both dropouts. Then tighten by holding one nut
with a wrench while tightening the other 240 In-Lbs (27 Nm) with
a torque wrench. Switch the tools to the other side and repeat.
See also Section 4 A 3 of the Cannondale Owner's Manual, entitled
"Removing and Installing Bolt-On Wheels."
WARNING
RIDING WITH IMPROPERLY ADJUSTED WHEEL RETAINING NUTS
CAN ALLOW THE WHEEL TO WOBBLE OR DISENGAGE FROM THE
BICYCLE, CAUSING DAMAGE TO THE BICYCLE, AND SERIOUS
INJURY OR DEATH TO THE RIDER.
Therefore, it is essential that you:
1. Ask your dealer to help you make sure you know how
toinstall and remove your wheels safely.
2. Understand and apply the correct technique for installing
your wheel with axle nuts.
3. Before each ride, check that the wheels are securely bolted
in place. This is done by checking that the nuts are properly
torqued.
INSPECT FOR SAFETY
WARNING
FREQUENT INSPECTION OF YOUR BIKE IS IMPORTANT TO YOUR
SAFETY.
Read your Cannondale Bicycle Owner's Manual and consult
with your Cannondale Dealer in order to make sure your bike is
inspected regularly.
YOU CAN BE SEVERELY INJURED PARALYZED OR KILLED IF YOU
IGNORE THIS WARNING.
CANNONDALE WARRANTY
Your Cannondale Track frame is warrantied against manufacturing
defects in materials and/or workmanship for the lifetime of the
original owner. Under this warranty we will repair any defective
frame or, at our discretion, we will replace a defective frame with
the same or comparable model (due to product evolution). See the
standard Cannondale Owner's Manual for more details.
All other components, including frame fixtures and finishes (paint
and decals) are warrantied against manufacturing defects in
materials and/or workmanship for a period of one year from the
date of purchase.
For complete information regarding your Cannondale Limited
Warranty, please refer to your Cannondale Bicycle Owner's
Manual.
Direction to Tighten Cog
Direction to Tighten Lock Ring
