14
SYSTEM INTEGRATION (SI)
CRANKSET INFO
Crankarm Removal
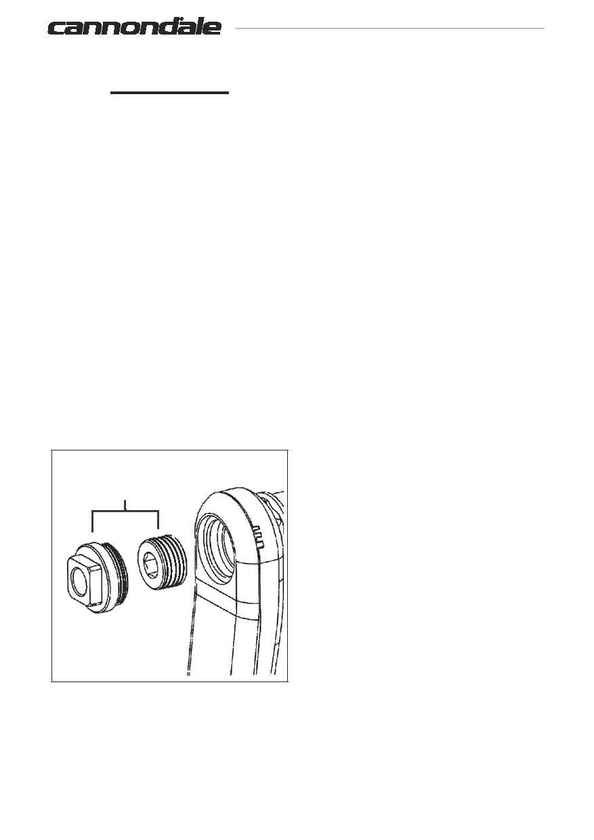
Use Cannondale tool - KT013/. Be sure to clean
and grease the threads of the spindle, crankarm,
and tool parts before removing.
1. Remove the crankarm fixing bolt (turn
counter-clockwise) and the washer from
the crankarm. Be sure to insert the 8mm
wrench completely into the fixing bolt
before attempting to loosen it. And, take
care not to lose the steel washer under the
bolt head.
2. Grease the threads of the tool stud (1) and
install it through the crankarm and into the
bottom bracket spindle. Screw it into the
spindle until the top of the stud is flush
with the top of the spindle.
3. Next, apply grease to the threads of the
tool body (2) and exposed face of the tool
stud. Install the body into the crankarm
completely and tighten it snug with a 15mm
open end wrench.
KT013/
15mm
8mm
1
2
Figure 12
SI Crankarm Removal Tools
4. Insert a 8mm hex wrench through the tool
body and into the stud. Hold the body and
turn the wrench counter-clockwise until the
crankarm can be removed from the spindle.
5. Repeat steps 1-4 for the other crankarm.
Spindle Removal
1. Remove the crankarms.
2. Remove the wave washer, shims, spacer
bearing shield and seal from the drive side
(right) spindle end.
3. Remove the spindle from the non-drive side
(left).
Bearing Inspection
The inner bearing races of both bearings should
rotate smoothly and quietly with only the force
of your finger. It should not move side-to-side.
The rotation should not stick or feel gritty.
There should not be any play detected in the
inner race and the bearing should not be free to
slide in the bottom bracket shell.
The bearings are a press fit and if they move in
the shell, this is an indication of damage to either
the bearings or bottom bracket shell.
NOTE: Loose bearings can be a cause of
"creaking."
