Page 8 of 18
Important Manual Information
GEMINI, GEMINI Thru12TM,GEMINI DHTM
REMOVAL AND INSPECTION OF THE SWINGARM PIVOT ASSEMBLY
4. Place the bike upright in a bicycle work stand so that the wheel is only raised slightly off the ground.
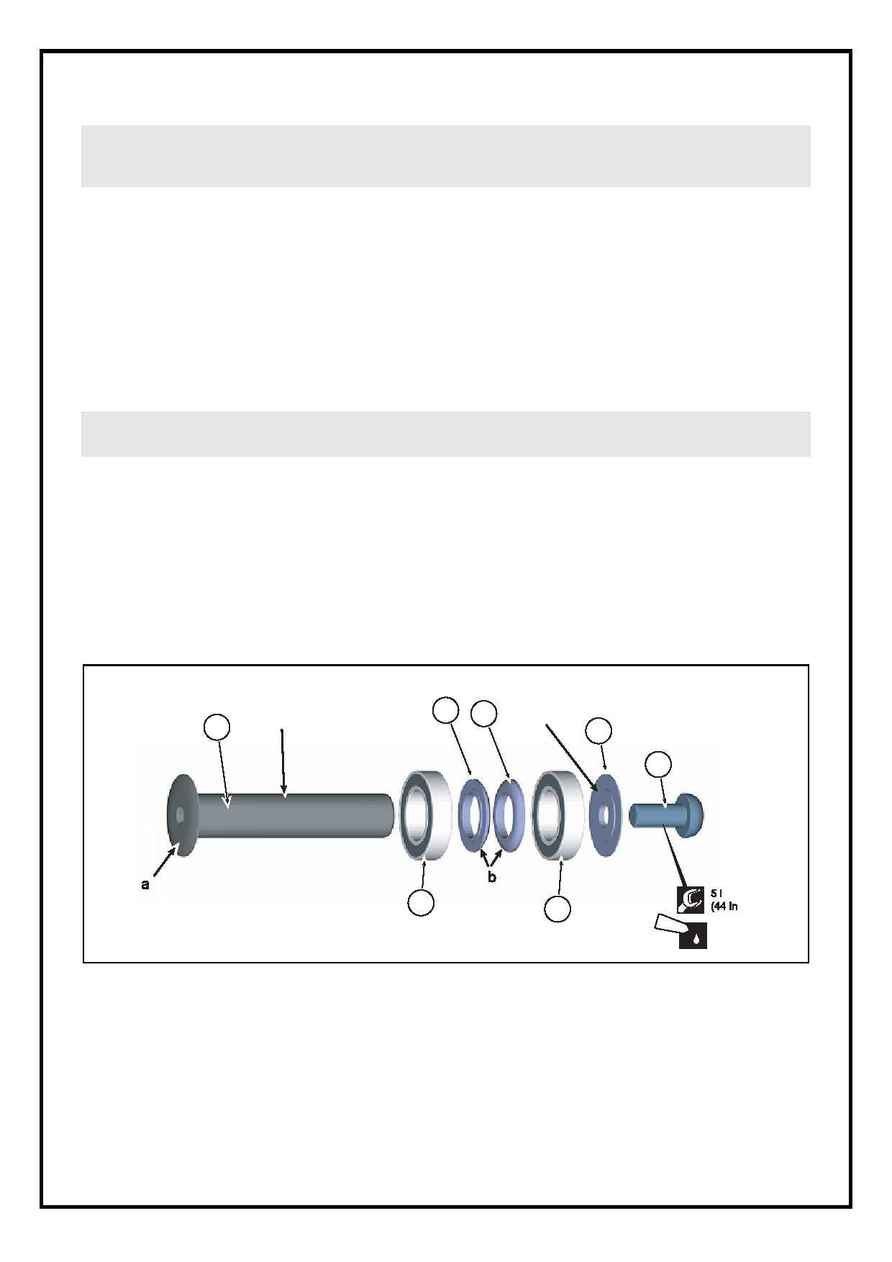
5. Insert a 4mm hex head wrench into the head of the pivot bolt (1) on the right side of the bike to hold it. Loosen the
fixing bolt (2) on the left side of the bike and remove the washers (3) located between the swingarm bearings and the
setatube. Notice that the small raised side (c) of the shield faces the bolt. Be sure to face correctly when reinstalling
the washer.
6. Make sure the swingarm is secured from movement. Use a wooden dowel to push the pivot bolt out if necessary.
7. Be sure to remove and inspect the bearing spacers (5) on each side of the seattube. Notice that the rounded sides (b)
face the seattube. Inspect the spacers for damage.
8. Turn the inner race of each swingarm bearing (4), with your finger. Each should rotate smoothly without play. Both
bearings should fit tightly in the swingarm holes.
9. Inspect the pivot hole in the seattube for any sign of damage. Clean the pivot bolt and seattube pivot hole. Grease the
pivot bolt and slide the pivot bolt in and out of the hole and rotate it. If you feel any resistance, it may be an indication
that either the bolt or hole in the seattube has been damaged.
1. To reinstall the pivot bolt assembly, clean the pivot hole in the seattube with a clean dry cloth. Inspect for any damage
to the hole.
2. Generously lubricate the outer surface pivot bolt with a high-quality bike grease, position the shields between the
swingarm and seattube and insert the pivot bolt. The head of the pivot bolt (a) should be positioned on the drive side
(right) of the bike to maintain the necessary clearance.
NOTE: When you insert the pivot through the swingarm and seattube, make sure the rounded sides (b) of both spacers
face toward the seattube.
3. Install the shield (3) with the small end (c) facing toward the pivot bolt.
4. Apply Loctite #242 to the threads and tighten the fixing bolt (2) to 12 N·m (44 In·Lbs).
CAUTION: In the following steps, make sure the weight of the swingarm is supported so it does not drop against the
seattube or shift unexpectedly when the pivot bolt is removed. Wrap a thick towel around the seattube so that contact
with the swingarm is cushioned.
CAUTION: If damage is found to any part of the assembly, before renewing the assembly, we recommend that you
have your bike thoroughly inspected by a Cannondale Dealer.
Fig. 6.
Pivot Assembly
c
Grease
1
113495
4
113510
4
113510
5
113493
5
113493
3
113494
2
113 71
N·m
·Lbs)
Loctite
#242
