Page 10 of 18
Important Manual Information
GEMINI, GEMINI Thru12TM,GEMINI DHTM
INSTALLING THE REAR WHEEL
1. Thoroughly clean and inspect the rear brake carrier assembly, axle, left dropout axle hole and the right dropout relief
and derailleur hanger. Make sure the brake carrier is assembly is in good condition and assembled correctly. Consult
Fig. 7.
2. Remove the brake caliper mounting bolts and remove the caliper from the carrier body.
3. Position the rear wheel hub between the inner face of the carrier and the right swingarm dropout.
4. Apply a thin film of grease to the axle and slide the small end of the axle through the brake carrier into the non-drive
side (left) dropout. Slide it through the brake carrier and wheel hub.
5. See Fig. 9. Apply Loctite #242 to the non-drive side dropout clamp bolt (1) and tighten to 5.0 N·m (44.2 In·lbs).
6. Apply Loctite # 242 to the bolt threads and install the derailleur hanger/axle clamp) (2) so that the lower face (a) has
no gap; the face of the axle clamp /derailleur hanger should mate with the swingarm dropout face. A gap (b) should be
present between the upper face of the axle clamp derailleur and the swingarm dropout face. The lower bolt (3) should
be tightened to the final torque. Tighten the upper bolt (5) snug.
7. Now, apply Loctite #242 to the axle bolt (1) and install into the axle end. Slip a hex wrench through the hole to hold the
axle from the non-drive side to hold it from rotating and tighten the axle bolt to 12.0 N·m (106.0 In·lbs).
8. Tighten the upper axle clamp bolt (5) to 5.0 N·m (44.2 In·lbs). A smaller gap should still be present.
9. Reinstall the brake caliper making sure to position the brake rotor between the pads. Use Loctite #242 on the caliper
mounting bolts and tighten to 5.0 N·m (44.2 In·lbs). Test the brake system for proper operation before riding the bike
CAUTION: When removed, handle the caliper and brake line carefully. Do not kink, twist or bend the brake line. Do not
allow. the caliper to hang by the brake line. Prevent brake pad contamination with dirt, grease, or oils.
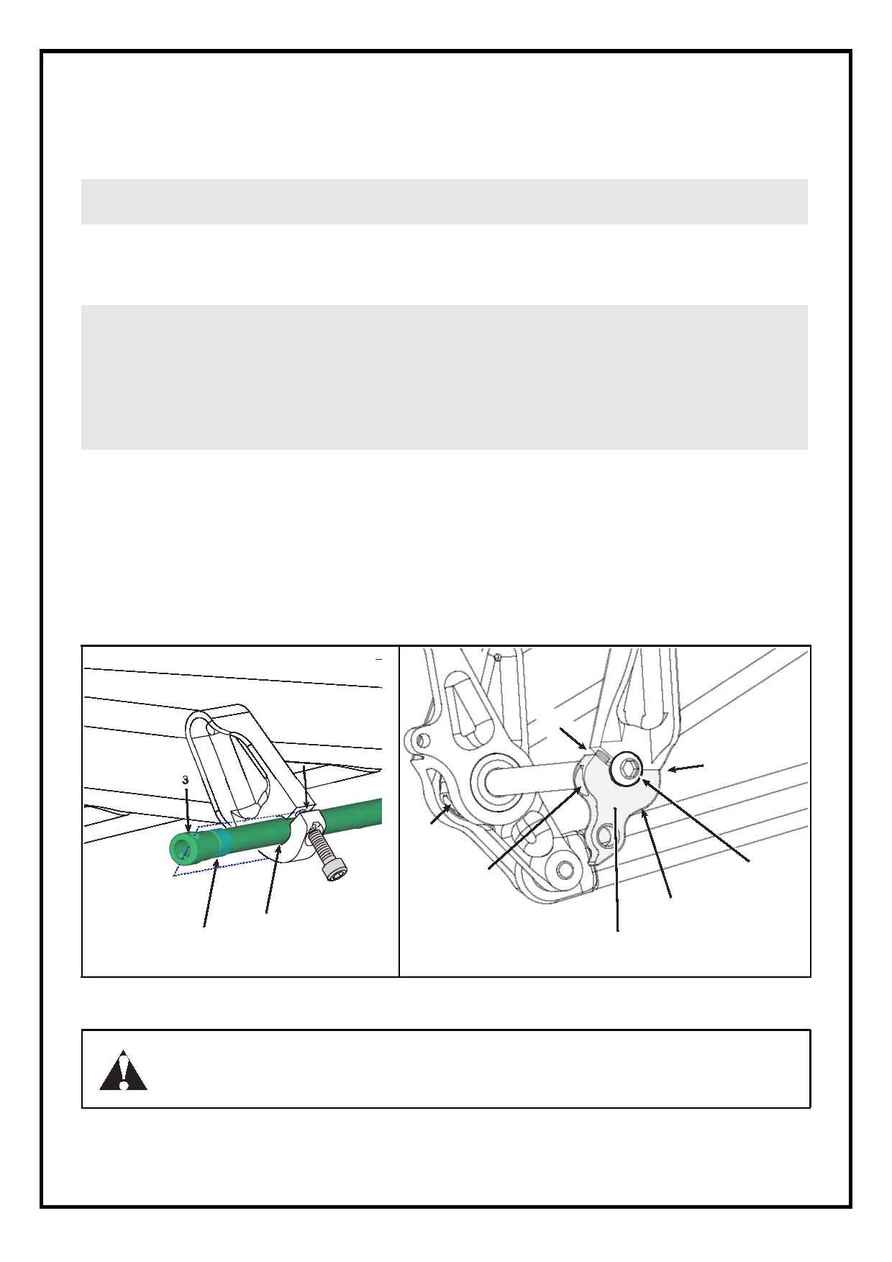
CAUTION: The ovalized area (1) of the axle and the ovalized non-drive side (left) dropout hole (2)
requires that you
pay special attention when inserting the axle through the brake carrier and swingarm hole. These features are hidden
from view. Always turn the axle to align its shape with that of the dropout hole and always slide the axle through the
hub with your fingers. Notice in Fig. 8. that the axle hole (3) aligns with the dropout gap (a). If you attempt to install the
axle without aligning the oval features of each part damage will result. Also, as you slide the axle through the hub,
make sure the drive side end of the axle fits with the drive side dropout relief. If it contacts the inner face of the drive
side drop out, it will prevent the axle from sliding in fully and the oval features of the axle and non-drive side drop out
will not fit together.
Fig. 8.
Correct Alignment of Ovalized Axle/
Dropout
Fig. 9.
Axle Installed
WARNING: Incorrectly installing the rear brake assembly (brake link arm, brake carrier, brake
caliper and pads) can result in serious brake damage. You can lose the ability to slow or stop
your bike. You can be severely injured or killed in an accident.
Always thoroughly test your
brakes after you reinstall the wheel.
2
1
a
B
B
B
B
b
b
b
a
4
3
2
5
1