E.19
CHAPTER TWO
Guide to Safe Bicycle Trailer Use
Connecting the trailer to the bicycle: quick-release mount
To install the hitch cup with a wheel quick-release
1. Open, and then remove, the lead bike's
rear wheel quick-release.
Follow the procedures in your Bicycle Owner's
Manual.
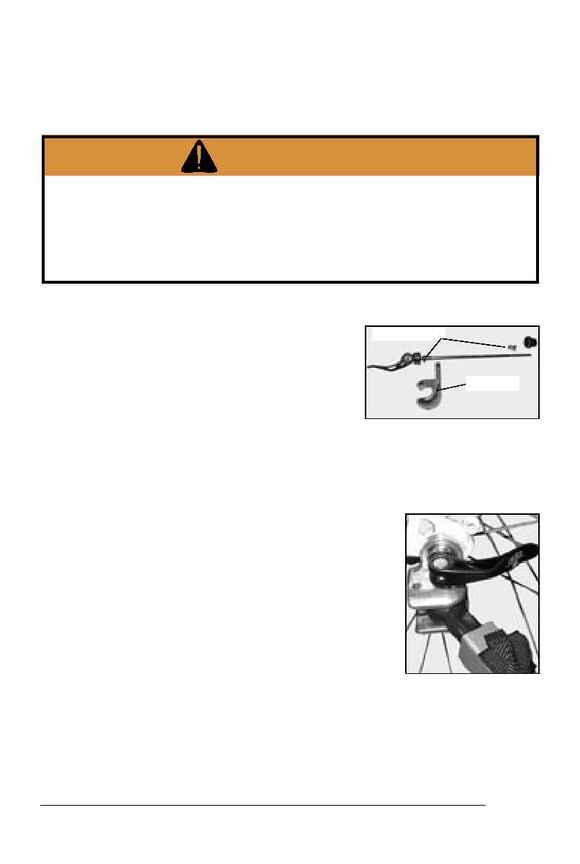
2. Place the special Trek quick-release
mechanism, with one conical spring
attached, through the hitch cup
(Figure 2.3).
Use only the quick-release provided with the Trek trailer to attach the
trailer to your bicycle, as other quick-releases may not be strong enough,
may be too short, or in other ways not be safe in use with the trailer hitch.
3. Slide the quick-release rod through the rear wheel axle and
attach the second conical spring and the quick-
release adjusting nut.
4. With the hitch cup properly oriented below the
quick-release (Figure 2.4), adjust and move the
quick-release lever to its closed position.
The lever should point straight back (Figure 2.4) to prevent
inadvertent opening while riding with the trailer.
To install the hitch cup with threaded axle nuts
1. Remove the left rear axle nut and washer(s).
2. Place the hitch cup over the left end of the
axle with the hitch cup oriented below the axle
(Figure 2.4).
3. Install the washer(s) and axle nut, and tighten
the nut.
Make sure the threaded portion of the wheel axle is long enough to come
even with, or protrude from, the end of the axle nut. If the axle is too
short, tightening the nut could damage the axle and make the connection
to the trailer unsafe.
Figure 2.4- Quick-release lever
position
Conical spring
Figure 2.3- Special quick-release and hitch
Hitch cup
WARNING
Failure of the attachment of the rear wheel and the trailer
hitch cup through use of an inadequate quick-release device,
or a threaded axle which is too short, may cause loss of
control resulting in personal injury. Use only the supplied
quick-release, or with a threaded axle make sure the axle has
adequate thread engagement.
CONNECT THE TRAILER TO THE
LEAD BICYCLE PROPERLY
