ENGLISH
Introduction
The drivetrain consists of the parts of the bicycle
that transmit power to the rear wheel. This system
includes the pedals (and toeclip assemblies on some
models), the crankset consisting of the left and right
crank arms, the chainrings and bottom bracket
assembly, the chain, and the cassette (cog or
freewheel on some models) (Fig. 39). When the
components of this system are working together
properly shifting will be easy, your bike will be quiet,
and its efficiency can reach its maximum. For bikes
equipped with Shimano Nexus 7 speed drivetrains,
also refer to that section.
Inspection
Once a month, inspect the chain and cassette. The chain should be
clean, free of rust, and properly oiled. All links of the chain should pivot
smoothly and without squeaking, and no links of the chain should be
deformed. Just like the chain, keep the cassette as clean as possible.
Cleaning and lubrication procedures are covered in the Lubrication
section. To inspect the cassette or freewheel, take the chain off and rotate
the cassette in your hands. If you hear a grinding noise or your cassette
stops immediately after spinning it, the cassette may need adjustment or
replacement. Take your bicycle to your dealer for service.
On single speed bikes, check the chain tension once a month. When
grasped in the middle of the chain run between the front and rear
sprockets, there should be a total of 1/4 to 1/2 inches (6-12 mm) total
vertical movement (Fig. 40).
On bikes with a chainguard, check that the chainguard is firmly attached
and correctly aligned once a month. Check the chainguard for looseness.
Push side to side, and tap on it. Any movement or rattling may indicate
that the chainguard is loose. Lift the rear wheel off the ground and rotate
the crankarms. Listen for any sounds which might indicate the crank or
chain is rubbing on the chainguard. Realign the chainguard so that it does
not rub, and tighten the attachment bolts firmly so that the chainguard
cannot move.
Some bikes are equipped with a CCD, or Chain Control Device (Fig. 41).
This plate is designed to protect your bike in case of chainsuck, so keep it
properly adjusted. Once a month check that there is between 0.5 and 1.0
mm clearance between the CCD and the chainrings at the closest point,
and tighten the CCD bolts to 20-25 lb·in (2.3-2.8 Nm).
Every 3 months, inspect your pedals and toeclips. Tighten the pedals
into the crank arms to 350-380 lb·in (40.2-42.9 Nm). Tighten the right
pedal by turning the pedal shaft clockwise, but tighten the left pedal in a
counter-clockwise direction. Check that the pedal bearings are properly adjusted. Rotate and
move the pedals right to left and up and down with your hand. If you feel any looseness or
roughness in the pedal bearings, your pedal needs to be adjusted, re-greased, or replaced by
your dealer. Make sure your toeclips are securely tightened to the pedal, and that the pedal
reflectors are clean and securely in place.
Every 3 months inspect the crankset, including the left and right crank arms, the bottom
bracket set (spindle and bearing assembly), and the chainrings. Tighten the crank bolt on each
crank arm to 350-435 lb·in (39.5-49.2 Nm). Tighten the chainring bolts to 50-70 lb·in (5.7-7.9
Nm). Check the bottom bracket bearing adjustment by first removing the chain from the
chainrings, then rotate the crank so that one of the arms is parallel the seat tube. Put one hand
on the crank arm and one hand on the seat tube and attempt to move the crank arm laterally
toward and away from the seat tube. If the crank feels or sounds loose, the bottom bracket
bearings need to be adjusted by your dealer.
Next, spin the cranks. If the motion stops abruptly or you hear a grinding noise coming from
the bearings, the bearings need to be adjusted or re-greased by your dealer. Also clean the
chainrings and inspect them for damage. If the teeth are bent or broken the chainring should be
replaced by your dealer.
Every 3 months, check your chain for wear with a chain wear gauge or a ruler. Each full link of
a new chain measures one inch. If 12 links of your chain measures 12 1/8 inches or more, it
should be replaced. With good maintenance, a chain usually lasts 1000 to 1500 miles. Replacing
the chain takes special tools and training and should only be done by your dealer.
Adjustment
To adjust the chain tension on a single speed bike, gradually loosen the rear wheel axle nuts
on alternate sides of the wheel, slide the wheel to re-tension the chain, and center the wheel in
the frame. Some models have a chain tensioning device which helps position the wheel. Follow
the wheel Inspection and Adjustment procedures in the Wheels section to re-install the wheel.
Adjusting training wheels is covered on page 9.
To adjust the CCD (Fig. 41), loosen the CCD attachment bolts and place the CCD plate so that
there is between 0.5 and 1.0 mm clearance between the plate and any part of the chain rings,
including "pickup teeth" on the sides of the chainrings. Tighten the CCD bolts to 20-25 lb·in (2.3-
2.8 Nm), and then rotate the cranks fully while rechecking for correct clearance. Any bottom
17
16
DRIVETRAIN--PEDALS, CRANK, CHAIN, AND CASSETTE
Fig. 41
Fig. 39
Chain
Cassette
Crank
bolt
Pedal
Chainring
Fig. 40
bracket work or tightening of the right crank arm may require readjustment of the CCD plate.
Adjustment of any part of the drivetrain including the crankset, bottom bracket bearings,
cassette, pedals, or chain installation requires special tools and training. These services should
be performed by your dealer.
Lubrication
Once a month, clean the cassette and oil the chain. Always place a rag behind the chain to
avoid getting oil on the rest of the bicycle. Use Wrench Force® synthetic chain lube or similar
lubrication. After oiling your chain, wipe off the excess oil with a rag. To clean the cassette,
remove the surface dirt that gathers around the cog teeth with Wrench Force® degreaser or a
similar solvent, and a brush. Do not use gasoline because it's too flammable and leaves a
grease-contaminating film after evaporating. Cleaning the cassette bearings requires special
tools and should only be done by your dealer. Do not disassemble the cassette.
Once a year, regrease the part of the pedal axles that thread into the crank arms. Note: There
are right and left pedals. Put the right pedal on the right crank arm and the left pedal on the
left crank arm. To remove the pedals turn the pedal spindle counter-clockwise for the right
pedal, but clockwise for the left pedal spindle. Apply a light coat of Wrench Force® synthetic
grease or a similar lubricant over all the threads, and re-install the pedals on the proper side.
Follow the tightening instructions for pedals in Inspection.
Regrease the pedal bearings and the bottom bracket bearings once a year. These operations
require special tools and training, so they should only be done by your dealer.
Note: Some pedal bearings and bottom bracket bearings are permanently sealed and do not
require yearly re-greasing.
SHIMANO NEXUS 7 SPEED SHIFT SYSTEM
Introduction
The Shimano Nexus 7 speed shift system consists of those parts of the
bicycle which allow you to shift gears including the shifter, rear hub, and
shift cable. The shifting mechanism is enclosed, keeping the shifting
system lubricated for low maintenance.
Shifting Pointers
When shifting gears, plan ahead. Shifting gears is best performed when
coasting, stopped, or back pedaling. If you must shift while pedaling, reduce
your pressure on the pedals. Excessive chain tension makes shifting
difficult. Choose the gear most comfortable for riding conditions. You
should be able to maintain a constant rate of pedaling.
Listen to your bike. A properly adjusted shift system is quiet. If an unusual
noise follows any shift, your shift cable may need to be adjusted. If after
adjustment the noise persists or grows louder, stop the bicycle and try to
locate the noise. If necessary, ask your dealer to identify and correct any
problems. For more information about your shift system consult your dealer.
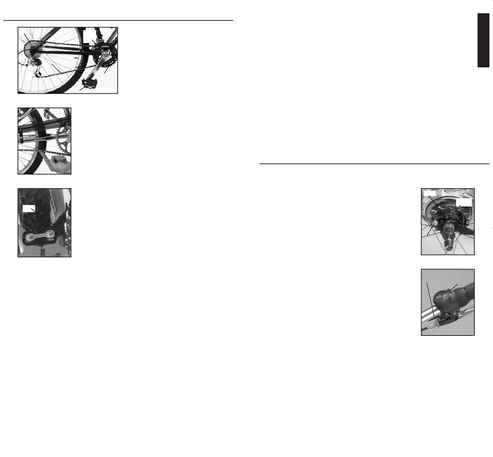
Inspection
Before every ride, make sure the Nexus hub gears are properly adjusted.
With the shifter in 4th gear, the red lines on the hub's pulley and the cog
joint bracket (Fig. 42) should line up.
Once a month, check the shift cable for kinks, rust, broken strands, or
frayed ends. Also check the housing for bent ends, cuts, broken coils and
wear. If you suspect a problem with your shift cable, do not ride your
bicycle. Replace the cable and/or housing before riding your bicycle by
following these instructions, or take your bike to your dealer for service.
Adjustment
If the red lines on the hub's pulley and the cog joint bracket do not line
up when the shifter is in 4th gear, adjust the gear cable tension. Rotate the
shifter barrel adjuster (Fig. 43) until this alignment is achieved. Shift to 1st gear, then back to
4th, and recheck the adjustment.
Lubrication
Lubricate shift cables with Wrench Force® synthetic chain lube or a similar lubricant
whenever they are being replaced. Lubricate the Nexus hub bearings once a year. This
procedure takes special tools and training, so should be done by your dealer.
To replace the shift cable, loosen the cable fixing bolt and remove the cover on the front of
the shifter secured by a phillips head screw. Slide the cable end cover forward. Note the path of
the old cable as you remove it. Install a new cable in the shifter following the old path, and
reattach the cable fixing bolt. Follow the instructions in Adjustment to finish installation.
Fig. 42
Fig. 43
Shift cable
clamp bolt
Pulley
Cog joint
bracket
Shift cable
barrel adjuster
Cable end
cover
CCD