ENGLISH
15
14
SEAT AND SEATPOST
Introduction
The seat and seatpost are your primary support on the bike. Their
adjustment is important for your comfort and pedaling efficiency. Ensure
that your position on the bike is correct, comfortable, and that both the
seat and seatpost are securely tightened to hold this adjustment.
Inspection
Inspect the seatpost quick release lever, or seat post binder bolt, for
proper tightness every month.
For quick release levers, move the quick release lever to the
OPEN
position. With the lever halfway between the
OPEN
position and
CLOSED
position, tighten the quick release adjusting nut on the
opposite end of the quick release axle. Place the quick release lever in the
palm of your hand and move the lever into the
CLOSED
position. At the
halfway closed position of the quick release lever, you should start to feel
some resistance to this motion. If the lever is moved to the
CLOSED
position with little or no resistance, clamping strength is insufficient.
Return the lever to the
OPEN
position, tighten the quick release
adjusting nut further and close the lever, and test again for resistance.
Check to ensure that the seat is secure by attempting to turn the seat
and seatpost in the frame, and attempt to move the front of the saddle up
and down. If the seat rotates, is loose, or moves up and down, tighten the
binder bolt or quick release, or seat fixing bolts, and repeat the test. Never
engage the seatpost binder lever with the seatpost out of the frame.
· For seat post binder bolts (Fig. 33), tighten to 85-125 lb·in (9.6-14.1 Nm).
· For single seat fixing bolts using a 6 mm allen wrench, tighten to 150-
250 lb·in (17-28.3 Nm).
· For double seat fixing bolts using a 5 mm allen wrench (Fig. 33),
tighten to 80-125 lb·in (9.6-14.1 Nm).
· For seat fixing bolts using a 13 or 14 mm open end wrench (Fig. 34),
tighten to 180-220 lb·in (20.3-24.9 Nm).
· For seatposts with two seat fixing bolts using a 4 mm allen wrench,
tighten to 45-60 lb·in (5-6.8Nm).
Adjustment
Seat angle (tilt) and fore-aft position affect both seat comfort and
handlebar comfort by changing the amount of pressure placed on the
handlebars. The height of the seat is very important for comfort, safety,
and efficiency. With proper adjustment the right bike seat will be
reasonably comfortable even for long rides. If your saddle is not
comfortable or causes numbness, you may need to adjust the saddle or
select a seat more suitable to your personal needs. Consult
your dealer if you need help attaining comfort on your bike.
To adjust the angle of the seat, loosen the seat fixing bolt
just far enough so that the seat can be tilted fore and aft.
Place a straight edge, such as a ruler, across the top of the
seat to see this angle better. The correct adjustment of this
angle is largely a matter of personal preference; first try
riding with this angle parallel to the ground. For bikes with
rear suspension, try tilting the saddle nose slightly down so
that compression of the rear shock under your body weight
(sag) results in a flat saddle.
The seat can also be moved forward or backward along
the seatpost to increase comfort as well as adjust the
distance to the handlebars. After making these adjustments,
retighten the seat fixing bolt as in Inspection.
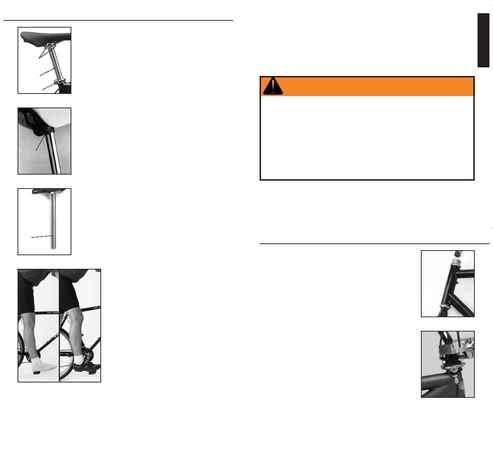
For some types of riding, like BMX, pedaling efficiency is
less important than the maneuverability of a lower seat
position. To check the seat height for greater efficiency such
as that required for longer distance cycling, position the
crank arms so they are parallel to the seat tube while
someone holds the bicycle up. Place yourself on the seat in
riding position without shoes. Your extended leg should be
straight when your heel rests on the bottom pedal (Fig. 36).
The correct position for you will allow the knee of your
extended leg to be bent slightly when wearing your shoes, in a proper riding position; with the
ball of your foot on the pedal. To adjust the height of the seat, loosen the seatpost binder bolt,
or quick release lever, change the seat height, and re-tighten the seatpost lever or bolt as
described in the Inspection section. Also note the following
WARNING
.
Fig. 33
Seat fixing
bolts
Seatpost
Seatpost binder bolt
Fig. 34
Fig. 35
Seat fixing
bolt
Minimum
insertion
mark
Fig. 36
Lubrication
Lubricate the seatpost every year (except OCLV carbon composite frames; see Care of Your
Aluminum or Carbon Frame or Fork on page 26). To do this, loosen the seat post quick release
lever or bolt, and remove the seatpost from the frame. Wipe the old grease off the seatpost and
clean if necessary. Apply a thin layer of Wrench Force® synthetic grease or a similar lubricant to
the section of the seatpost that will be inserted into the frame. Insert the seatpost into the frame,
adjust to the proper height, and engage the binder lever or bolt, as explained in Inspection.
WARNING
Make sure that the minimum insertion mark, also called the maximum
height mark (Fig. 35) remains inside the frame. A minimum of 2 1/2
inches (64 mm) of seatpost must remain in the frame (Klein frames
require at least 4 inches (100 mm) of the seatpost remaining inside the
frame which may be greater than the length marked on the seatpost).
Riding with the seat raised above this height may cause loss of control
resulting in personal injury or damage to your bicycle.
Some medical people believe that extended riding with an improperly
adjusted or fitted saddle which does not support your pelvic area correctly
may cause numbness and injury to nerves and blood vessels. Numbness
can be avoided with proper bicycle fit. If you experience numbness while
riding your bicycle, have your dealer properly fit your bicycle.
Introduction
The fork is responsible for holding the front wheel of your bicycle. The
headset (Fig. 37) is the bearing system which allows the steering of your
bike by rotation of the fork, stem, and handlebars. On freestyle bikes, a
rotor (Fig. 38) allows the handlebars to turn 360 degrees for freestyle
tricks, without interference from the brake cables.
Inspection
Once a month inspect the headset of your bicycle. Stand over the top
tube of your bicycle with both feet on the ground. Apply the front brake
firmly while you rock the bicycle forward and backward. If your bike is not
equipped with a front brake, do this inspection by turning the front wheel
to be across or perpendicular to the pushing force.
Look, listen, and feel for looseness of the headset bearings. To check that
the headset is not too tight, slowly rotate the fork and handlebars to the
right and left.
If the fork makes any grinding noises, or feels like it sticks or binds at
any point in the rotation, the bearings may be too tight. If your headset
bearings are too loose or too tight, do not ride the bicycle. Take it to your
dealer for maintenance.
The rotor should not interfere with the headset function in any way. Look
and listen for irregular noises or rubbing from the rotor.
Adjustment
Headset adjustment requires special tools and training, and should only
be performed by your dealer. Further adjustment of the rotor is covered in
the Brake System section.
Lubrication
Regrease the headset once every year. This requires special tools and training, and should
only be performed by your dealer.
HEADSET AND FORK
Fig. 37
Fig. 38