page
Handlebars, bar-ends, and stem . . . . . . . . . . . . . . . . . . . . . . . . . . . . . . . . . . . . . . . . .12-13
Seat and seatpost . . . . . . . . . . . . . . . . . . . . . . . . . . . . . . . . . . . . . . . . . . . . . . . . . . . . .14-15
Headset and fork . . . . . . . . . . . . . . . . . . . . . . . . . . . . . . . . . . . . . . . . . . . . . . . . . . . . . . . .15
Drivetrain- pedals, crank, chain, and cassette . . . . . . . . . . . . . . . . . . . . . . . . . . . . . .16-17
Shimano Nexus 7 speed shift system . . . . . . . . . . . . . . . . . . . . . . . . . . . . . . . . . . . . . . .17
Derailleur system . . . . . . . . . . . . . . . . . . . . . . . . . . . . . . . . . . . . . . . . . . . . . . . . . . . . .18-19
Brake system . . . . . . . . . . . . . . . . . . . . . . . . . . . . . . . . . . . . . . . . . . . . . . . . . . . . . . .20-23
Wheels . . . . . . . . . . . . . . . . . . . . . . . . . . . . . . . . . . . . . . . . . . . . . . . . . . . . . . . . . . . . .24-25
Reflectors . . . . . . . . . . . . . . . . . . . . . . . . . . . . . . . . . . . . . . . . . . . . . . . . . . . . . . . . . . . . .25
Care of your aluminum or carbon frame or fork . . . . . . . . . . . . . . . . . . . . . . . . . . . . . .26
Tire installation . . . . . . . . . . . . . . . . . . . . . . . . . . . . . . . . . . . . . . . . . . . . . . . . . . . . . . . . .27
Suspension forks . . . . . . . . . . . . . . . . . . . . . . . . . . . . . . . . . . . . . . . . . . . . . . . . . . . . . . .28
Rear suspension . . . . . . . . . . . . . . . . . . . . . . . . . . . . . . . . . . . . . . . . . . . . . . . . . . . . .29-30
Trekking accessories . . . . . . . . . . . . . . . . . . . . . . . . . . . . . . . . . . . . . . . . . . . . . . . . . . . . .31
13
12
INSPECTION, ADJUSTMENT, AND LUBRICATION
A Word About Torque Specifications
Torque is a measurement of the tightness of a threaded fastener such as a screw or bolt,
determined by using a torque wrench. The torque specifications in this manual are listed to help
you determine the correct tightness of parts and their threaded fasteners. More than anything,
these should be used to make sure you do not over tighten the fasteners. Over torqueing a
fastener does not provide extra holding power and may actually lead to damage or failure of a
part. For example, over tightening bar ends can crush a handlebar. Once a part is tight enough
to stay tight and be safe, it rarely does any good to tighten the part any further.
We offer a range of torque specifications. Similar parts in different bikes may require different
torques due to slight differences.
There are simple function tests you should perform to make sure a part is properly tightened
and we list them in this chapter. They should be performed whether a torque wrench was used
or not and will suffice as a test for proper tightness if you do not have a torque wrench. As an
example on pages 12-13 we show a test to determine if a stem is properly tightened to the fork.
Place the front wheel between your knees and try to rotate the stem by twisting the handlebars
from side to side. If the stem does not twist, it is properly tightened. While this test is
somewhat subjective, it places a much greater force on the system than is required of the stem
clamping force in normal riding.
Introduction
The handlebar assembly is primarily responsible for your ability to steer
and control the bike. In addition, the stem and handlebars work with the
seat to add comfort and efficiency to your cycling.
Inspection
Once a month, make sure the stem is in alignment with the front wheel,
and that all stem bolts are tight.
Tighten a stem expander bolt (Figs. 26 and 28) to 175-260 lb·in (19.8-
29.4 Nm). Tighten handlebar clamp bolts (Figs. 26-28) to 100-120 lb·in
(11.3-13.6 Nm) on welded stems, or 150-180 lb·in (17-20.3 Nm) on forged
stems. Tighten handlebar clamp bolts on 4 bolt BMX type stems (Figs. 27
and 28) to 80-100 lb·in (9-11.3 Nm). Tighten steerer clamp bolts on
standard direct connect stems (Fig. 27) to 100-120 lb·in (11.3-13.6 Nm).
Tighten steerer clamp bolts on BMX direct connect stems (Fig. 27) to 145
lb·in (16.4 Nm). If you are unsure of which type of stem your bike is
equipped with, consult your dealer.
Some bikes are equipped with a stem having an adjustable rise, or angle.
With these stems, tighten the angle adjusting bolt (Fig. 26) to 150-170 lb·in
(17-20.3 Nm) after first making sure the teeth are correctly engaged, with
the corresponding teeth entered between the teeth of the mating part.
For bikes with an Airhead MC2 stem (Fig. 29), tighten the handlebar
clamp bolts to 35-40 lb·in (4.0-4.5 Nm), and tighten the MC2 collet nut
with the AirheadsetTM wrench to 300-360 lb·in (33.9-40.7 Nm).
Test the security of the handlebars in the stem, and the stem in the
frame, by attempting to twist the handlebars in the stem and by
attempting to turn them from side to side with the front wheel locked
between your knees (Fig. 31). Make sure that no cables are stretched or
pinched by rotating the handlebars.
Although the various nylon covered foam pads found on some bikes are
of a cosmetic nature, keep them securely attached to the bike. Once a week check that the pads
are secure and that they cannot fall off, or get caught on the bike's moving parts in any way.
HANDLEBARS, BAR-ENDS, AND STEM
With some bicycles it is possible for part, or parts, of the handlebar to
contact the frame as the front wheel turns to extreme angles. If a sharp edge
on any part of the handlebar were to make contact with the frame with
sufficient force, it could damage the frame. Check to see if your handlebar
contacts the frame in such a way that this could happen. Prevent such
damage by padding the handlebar parts, the frame, or both at the points of
contact. See your dealer for recommended protection devices or materials.
Bar-ends
Some bicycles include handlebar extensions attached to standard all
terrain handlebars. These grips, or bar-ends (Fig. 30), are designed for
climbing only. Never allow your bar-ends to come in contact with objects
which may cause you to lose control of your bicycle.
Ensure that the bar-ends face forward and away from you, the rider, and
that the bar-ends are pointing upwards from the handlebars at an angle not
less than 15° from parallel to the ground.
Once a month tighten your bar-end clamp bolts to 85-125 lb·in (9.6-14.1
Nm) to prevent them from rotating on the handlebars.
Adjustment
The angle and height of the handlebars is largely a matter of personal
preference blending comfort, efficiency, and balance. Your hands should be
comfortable and be able to easily operate all controls. If your hands, arms,
or shoulders are uncomfortable or numb you may need to adjust the
handlebars or select components more suitable to your personal needs.
Consult your dealer if you need help attaining comfort on your bike.
To adjust the angle of the handlebars, loosen the handlebar clamp bolt(s)
on the stem just enough that the handlebars can be rotated in the stem.
Position the handlebars to the desired angle, making sure they are
centered in the stem. After adjustment, follow the procedures and tighten
as shown in Inspection.
To change the handlebar height with a conventional stem (Figs. 26 and 28),
loosen the stem expander bolt two to three turns, then tap the top of the stem
expander bolt with a wood or plastic faced mallet to loosen the stem wedge.
Adjust the handlebars to the desired height, and retighten following the
procedures and instructions in Inspection (also note following
WARNING
).
Adjusting the handlebar height on a direct connect stem (Fig. 27) affects
the headset bearing adjustment. Adjusting the handlebar height on a
Airhead MC2 stems requires cutting the fork. These procedures require
special tools and training so this should only be done by your dealer.
Lubrication
The stem should be lubricated once a year. To lubricate a conventional
type stem (Figs. 26 and 28), loosen the stem expander bolt two or three
turns, then tap the top of the expander bolt with a wood or plastic faced
mallet to loosen the stem wedge. Remove the stem from the frame. Wipe
the old grease off the stem and clean if necessary. Apply a thin layer of
Wrench Force® synthetic grease or a similar lubrication to the section of
the stem that will be inserted into the frame, including the stem wedge.
Insert the stem into the frame, and follow the Adjustment and Inspection
procedures in this section to re-install your stem.
Lubricate a direct connect stem once a year. This procedure requires
adjustment of the headset bearings so should only be done by your dealer.
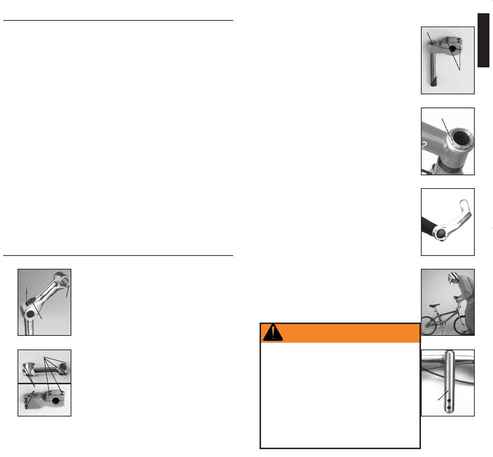
Fig. 26
Stem
expander
bolt
Angle
adjusting
bolt
Handlebar
clamp
bolts
Fig. 27
Handlebar clamp bolts
Steerer clamp bolts
Fig. 29
Fig. 30
Collet nut
Fig. 31
Fig. 32
Minimum
insertion
mark
WARNING
Loose bar-ends, incorrectly positioned bar-ends, or
catching bar-ends on objects may cause loss of
control resulting in personal injury.
Cutting handlebars to be shorter than their intended
length could cause them to be weak resulting in a loss
of control resulting in personal injury.
If you are unsure of the safety of your handlebar
system, do not ride the bicycle. Take the bicycle to
your dealer for adjustments. Never ride your bicycle
with the stem raised above the minimum insertion
mark (sometimes called the maximum height mark,
see Fig. 32) as this may cause loss of control
resulting in personal injury or damage to your bicycle.
A minimum of 2 3/4 inches (70 mm) of the stem
must always remain in the frame.
Fig. 28
Stem expander bolt
Handlebar
clamp bolts
ENGLISH