Clipless pedaling foot-retention systems
This bicycle may be equipped with pedals having a clipless foot retention
system which allows you to firmly attach your shoe to the pedal without
toeclips. Incorrect installation of the cleats could cause physical injury, so
cleat installation should be done by your dealer.
In addition, some clipless pedals allow adjustment of the force required
to enter or exit the pedals. For adjustment information, read the pedal
manufacturer's instructions supplied with your bike. If you did not receive
pedal information, get a copy from your dealer, or contact us and we'll
send them to you. The following information is only meant to supplement
the pedal manufacturer's instructions.
Familiarize yourself with the use of these pedals. If you are new to
clipless pedals, practice entry and exit before your first ride. Watch the
road while in motion. Looking at your pedals will make it difficult to see
upcoming obstacles. After first practicing in a stationary position, an
empty, flat parking lot provides an excellent place to practice the
following:
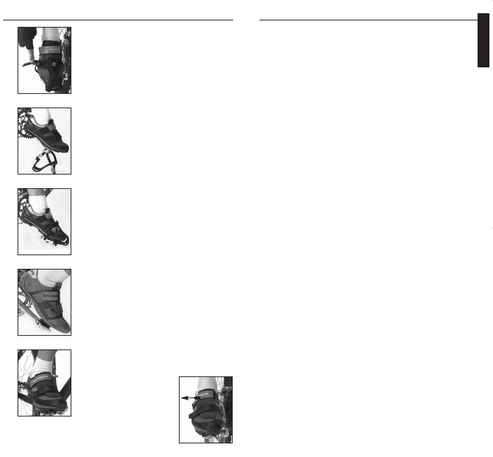
· Before attempting to engage your cleated shoe into the pedal, always
check both the cleats and the pedals for any contamination such as mud
and stones which may interfere with entry or exit of this system.
· To enter the pedals, engage the front of the cleat into the front of the
pedal (Fig. 23) and press down with the ball of your foot. You should hear
an audible click signifying completed entry into the pedal.
Check attachment by attempting a rolling motion on the pedal (Fig. 24).
If you can roll your shoe off the pedal, start the procedure again.
· To exit the system, twist your heel laterally away from the centerline of
the bike (Fig. 25).
Always disengage at least one foot
from the pedals before stopping.
Toe clips and straps.
This bicycle may be equipped with toe clips and straps. Familiarize
yourself with the use of toe clips and straps. Proper fitting toe clips place
the ball of your foot over the pedal axle for improved pedaling power.
Shoes which might allow your foot to become trapped by the toe straps,
such as those with wide, heavily patterned soles, should never be used
with toe clips and straps.
If you are new to this system, practice entry and exit before your first
ride. Watch the road while in motion. Looking at your pedals will make it
difficult to see upcoming obstacles. After first practicing in a stationary
position, a flat, empty parking lot provides an excellent place to practice
the following:
· Always keep toe straps loose enough to remove your feet quickly from
the pedals to remain upright. This is done by adjusting the buckle of the
toe strap (Fig. 20).
· To enter the pedals, first straddle the bike. Keep one foot on the
ground, and move the crank arm on the other side of the bike into the 5
o'clock position. To place your foot in the pedal, place the toe of your shoe
on the back edge of the upside down pedal with your toes pointed slightly
downward (Fig. 21). With a motion similar to scraping something off the
bottom of your shoe, flip the pedal into an upright position, and insert your
foot into the toe clip. This can be tricky at first, but practice will help you
improve. To mount the bike, push down on this pedal while pushing off with
the other foot, and at the same time, sit on the bicycle seat. Once moving,
put your other foot into the second pedal using the same technique.
· To exit this system, raise your heel so that the sole of your shoe clears
the top of the pedal (Fig 22). Withdraw your foot in an up-and-back
motion, make sure your foot clears the pedal, and bring the bike to a stop.
Always disengage at least one foot from the pedals
before stopping.
11
10
UNDERSTAND THE USE OF YOUR PEDALING SYSTEM
Fig. 20
Fig. 21
Fig. 22
Fig. 23
Fig. 25
Fig. 24
Frequency
Service Required
page
Every ride
Check wheel attachment (both) . . . . . . . . . . . . . . . . . . . . . . . . . . . . . . . . . . . .24-25
Check tire inflation . . . . . . . . . . . . . . . . . . . . . . . . . . . . . . . . . . . . . . . . . . . . . . . . .24
Check tires for wear, replace if necessary . . . . . . . . . . . . . . . . . . . . . . . . . . . . . .24
Check that wheels are straight . . . . . . . . . . . . . . . . . . . . . . . . . . . . . . . . . . . . . . .24
Check brakes . . . . . . . . . . . . . . . . . . . . . . . . . . . . . . . . . . . . . . . . . . . . . . . . . . .20-23
Weekly
Wipe off your bicycle with a damp cloth . . . . . . . . . . . . . . . . . . . . . . . . . . . . . . . . .8
Check for loose spokes . . . . . . . . . . . . . . . . . . . . . . . . . . . . . . . . . . . . . . . . . . . . .24
Check that coaster brake strap attachment bolt is tight . . . . . . . . . . . . . . . . . . .21
Lubricate suspension fork sliders . . . . . . . . . . . . . . . . . . . . . . . . . . . . . . . . . . . . .28
Check suspension fork bolts for tightness . . . . . . . . . . . . . . . . . . . . . . . . . . . . . .28
Check rear suspension bolts for tightness . . . . . . . . . . . . . . . . . . . . . . . . . . .29-30
Monthly
Inspect and lubricate chain and cassette . . . . . . . . . . . . . . . . . . . . . . . . . . . . .16-17
Inspect and lubricate derailleurs . . . . . . . . . . . . . . . . . . . . . . . . . . . . . . . . . . . .18-19
Inspect one speed chain tension . . . . . . . . . . . . . . . . . . . . . . . . . . . . . . . . . . . . . .16
Inspect for any loose nuts or bolts:
Seatpost binder lever or bolt . . . . . . . . . . . . . . . . . . . . . . . . . . . . . . . . . .14-15
Seat fixing bolt . . . . . . . . . . . . . . . . . . . . . . . . . . . . . . . . . . . . . . . . . . . . . .14-15
Handlebar stem expander bolt (standard stem) . . . . . . . . . . . . . . . . . . .12-13
Stem steerer clamp bolts (direct connect stems) . . . . . . . . . . . . . . . . . .12-13
Handlebar clamp bolt . . . . . . . . . . . . . . . . . . . . . . . . . . . . . . . . . . . . . . . . .12-13
Bar-end clamp bolts . . . . . . . . . . . . . . . . . . . . . . . . . . . . . . . . . . . . . . . . . .12-13
Fender, rack and light attachment bolts . . . . . . . . . . . . . . . . . . . . . . . . . . . .31
Inspect shift cables for wear . . . . . . . . . . . . . . . . . . . . . . . . . . . . . . . . . . . . . . .18-19
Inspect brake cables and hydraulic hoses for wear . . . . . . . . . . . . . . . . . . . .20-23
Check Shimano Nexus 7 speed hub and Inter-M brake . . . . . . . . . . . . . . .17, 21-22
Check wheel bearing adjustment . . . . . . . . . . . . . . . . . . . . . . . . . . . . . . . . . . . . .24
Check headset bearing adjustment . . . . . . . . . . . . . . . . . . . . . . . . . . . . . . . . . . . .15
Every 3 Months
Clean and polish finish . . . . . . . . . . . . . . . . . . . . . . . . . . . . . . . . . . . . . . . . . . . . . . .8
Inspect and lubricate brake levers and calipers . . . . . . . . . . . . . . . . . . . . . . .20-23
Inspect crankset . . . . . . . . . . . . . . . . . . . . . . . . . . . . . . . . . . . . . . . . . . . . . . . . .16-17
Inspect pedals and toeclips . . . . . . . . . . . . . . . . . . . . . . . . . . . . . . . . . . . . . . . .16-17
Inspect reflectors . . . . . . . . . . . . . . . . . . . . . . . . . . . . . . . . . . . . . . . . . . . . . . . . . .25
Every year
Re-grease bottom bracket bearings . . . . . . . . . . . . . . . . . . . . . . . . . . . . . . . . . . . .17
Re-grease wheel bearings . . . . . . . . . . . . . . . . . . . . . . . . . . . . . . . . . . . . . . . . . . .25
Re-grease headset bearings . . . . . . . . . . . . . . . . . . . . . . . . . . . . . . . . . . . . . . . . . .15
Re-grease pedal threads and bearings . . . . . . . . . . . . . . . . . . . . . . . . . . . . . . . . .17
Lubricate wheel quick releases . . . . . . . . . . . . . . . . . . . . . . . . . . . . . . . . . . . . . . .25
Lubricate seatpost . . . . . . . . . . . . . . . . . . . . . . . . . . . . . . . . . . . . . . . . . . . . . . . . .15
Lubricate handlebar stem . . . . . . . . . . . . . . . . . . . . . . . . . . . . . . . . . . . . . . . . . . . .13
Re-grease suspension forks . . . . . . . . . . . . . . . . . . . . . . . . . . . . . . . . . . . . . . . . . .29
This maintenance schedule is based on normal usage. If you ride your bike more than
average, or in rain, snow, or off road conditions, service your bicycle more often than the
schedule suggests. If any part appears to be malfunctioning, inspect and service it immediately,
or consult your dealer.
PERIODIC MAINTENANCE SCHEDULE
Recommended tools for proper bicycle maintenance:
Torque wrench with lb·in or Nm gradations
2, 4, 5, 6, 8 mm allen wrenches
9, 10, 15 mm open-end wrenches
15 mm box end wrench
Socket wrench, 14, 15, and 19 mm socket
T25 Torx wrench
No. 1 phillips head screwdriver
Tire levers and bicycle tube patch kit
Bicycle tire pump with gauge
Wrench Force® synthetic chain lube or similar lubricant
Wrench Force® synthetic grease or similar bicycle grease
Wrench Force® frame polish or similar frame protectant
Special high pressure air pump for rear shock or suspension fork
Note: Not all bicycles require all these tools
ENGLISH