· Do not tighten the quick
release by using the quick
release lever like a wing nut
(Fig. 9).
6. Orient the quick release levers so
that they do not interfere with any other
bicycle part or accessory part (such as
rack or fenders) and so that they will
not become accidentally snagged by
obstacles in the path of the bicycle
(Figs. 10 and 11).
7. Do these two tests to ensure that
you have adequately performed these
procedures:
· Pick the front of the bike off of the
ground, and give the top of the tire a
sharp downward blow (Fig. 12). The
wheel should not come off, be loose, or
move from side to side. If uncertain,
repeat the tightening process, as shown
in Steps 2-6 of these instructions.
· With the quick release lever
properly adjusted and in a closed
position, you will not be able to rotate
the quick release lever in a circular
motion parallel to the wheel (as opposed
to the flipping motion used to open and close the quick release lever- see Fig. 13).
8. For the rear wheel, follow the instructions for the front wheel, and note the correct
position of the quick release lever when closed (Fig. 11).
If your bicycle is equipped with axle nuts instead of quick release mechanisms (for bikes with
pegs, note special information below), make sure the axle nuts are tightened to 180-240 lb·in
(20.3-27.1 Nm) for a front wheel, and 240-300 lb·in (27.1-33.9 Nm) for a rear wheel.
For BMX bikes with axle nuts, where the front axle does not fit snugly inside the fork tips, a
special two-stage washer must be in place on both sides of the hub for correct wheel retention
(Fig. 14).
Some freestyle bikes have tubular axle extensions, called pegs (Fig 15). For bikes with pegs,
the two-stage washer goes against the fork tip as in Fig. 14, and additional washers and nut go
inside the peg. For axle nuts in pegs using a
15mm socket, tighten to 220-240 lb·in (24.9-
27 Nm). For axle nuts in pegs using a 19 mm
socket, tighten to 350 lb·in (40 Nm).
Use this test to ensure that you have
adequately performed these procedures:
· Pick the front of the bike off of the
ground, and give the top of the tire a
sharp downward blow (Fig. 12). The
wheel should not come off, be loose, or
move from side to side. Repeat this test
again for the rear wheel.
5
Check your brakes.
Hand brakes
Press each brake lever to make sure that the brakes move freely and stop the bike.
The brake pads should be adjusted so they are 1 to 2 mm away from the rim when the brakes
are not applied. Brake pads should be centered on the rim (Fig. 5). The toe-in shown in Fig. 5 is
to prevent squealing of the brakes. It may not be necessary to toe in used brake pads, or some
new direct pull or V type brakes. If your brakes are too tight, too loose, or not centered on the
rim, refer to the Brake System section of Chapter 3.
Disc Brakes
For disc brakes where the pads contact a disc attached to the wheel hub the pads should be
.25 to .75 mm away from the disc when the brakes are not applied. Always be careful inspecting
disc brakes, as they can become hot after hard use. Avoid placing your fingers in the disc rotor.
Coaster brakes
The brakes should engage in less than 60 degrees backwards rotation of the cranks (or 1/6
revolution). If your brakes do not firmly engage, take your bike to your dealer for service.
Also refer to
Use your brakes carefully
found on page 6 of this section under
Ride safely.
Fig. 5
Pad and rim should
be parallel
Brake pad aligned with
the rim surface
Direction of rim
rotation
0.5 - 1mm toe in
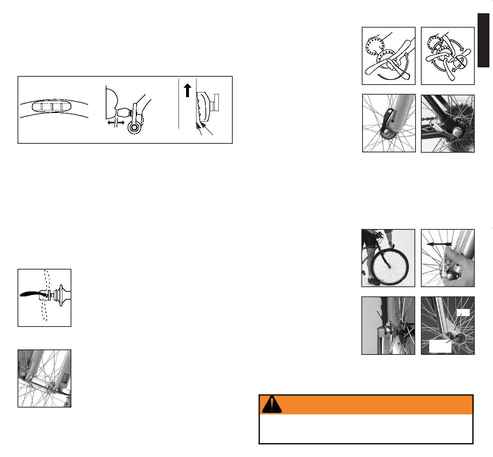
Check attachment of both wheels.
This bicycle may be equipped with a quick release wheel
retention mechanism. The quick release allows the wheel to be installed
and removed without tools. For proper and safe performance, read and
follow these instructions carefully:
1. Check both wheels of your bicycle before every ride.
2. Move the quick release lever to the
OPEN
position and set the
wheel so it firmly touches the inside of the fork ends.
3. With the lever about halfway between the
OPEN
position and the
CLOSED
position (Fig. 6), tighten the quick release adjusting nut on the
opposite end of the quick release axle until finger-tight (Fig. 7).
4. Place the quick release lever in the palm of your hand and move the
lever in a motion as shown in Figure 8. Move the lever into the
CLOSED
position (Fig. 10 for a front wheel or 11 for a rear wheel). At the halfway
closed position of the quick release lever, you should start to feel some
resistance to this motion.
5. If the lever is moved to the
CLOSED
position with little or no resistance,
clamping strength is insufficient. Simply return the lever to the
OPEN
position, tighten
the quick release adjusting nut further and close the lever, testing again for resistance.
When the quick release device is properly tightened, and clamped to the closed position,
the clamping force is adequate to cause metal into metal engagement (embossing) of the
fork surfaces.
Fig. 6
Open
Closed
OPEN
CLOSED
Fig. 8
Fig. 10
Fig. 11
Fig. 12
Fig. 7
Fig. 15
Fig. 14
Fig. 13
Two-stage
washer
4
WARNING
Failure to tighten wheel axle nuts, or failure to have wheel quick release
retention mechanisms properly adjusted and closed, may cause loss of
control resulting in personal injury. If you have any questions about the
operation of this system, consult your dealer.
Peg
Axle nut
and washer
ENGLISH
OPEN
OPEN
OPEN
OPEN
Fig. 9