Introduction
If your bicycle is equipped with rear suspension, ensure that it is operating properly before
every ride. Read the Rear Shock Owner's Manual you received with your bike. If you did not
receive a manual, get one from your dealer, or contact us and we'll send you one. The following
information is only meant to supplement the shock manufacturer's manual.
Identify the type of suspension on your bike by the illustrations provided. Read the instruc-
tions for (All Systems) as well as the specific information for your bike's suspension system.
All Systems
Inspection
After every 10 hours of use, inspect the shock mounting bolts and the pivot bolts for
tightness. This procedures requires removing the nut from the bolt or axle, cleaning the threads
thoroughly, applying a thread-locking compound (Loctite 242 is excellent) and re-tightening.
Adjustment
When adjusting the seat height on your full suspension bike, do not lower the bottom of the
seat post to any position closer than 1.5" (38 mm) to the top of the swingarm. Allowing the
swingarm to contact the seat post could damage your bicycle.
The recommended preload (initial spring pressure) adjustment of the rear shock, whether air
spring or coil spring, allows a slight compression of the spring when your weight is placed on
the bike called "sag". Correct adjustment allows about 15-25% sag measured at the rear shock.
To increase the preload on coil/over shocks, rotate the adjustment nut to compress the spring.
To make the suspension softer, rotate the nut to lengthen the spring. If the spring on your
shock does not offer the desired range of adjustment, replacement springs are available with
different spring rates. See your dealer.
On models using air shocks, the preload is adjusted by changing the air pressure inside the
shock using the high pressure shock pump provided.
Changing your suspension will affect handling and braking characteristics. After making a
change, carefully test the bike in a low traffic area until you are familiar with its performance.
Lubrication
No lubrication is required for the shock or the pivot of your full suspension bike. The pivot
uses a Teflon impregnated composite bearing. Avoid all lubricants as they may damage the
composite bearing. For best results and long life, simply wash the shock and pivot area with a
solution of soap and water, or just water.
Figure 84
Tighten shock mounting bolts to 61-75 lb·in (6.9-8.5 Nm). Tighten pivot bolts on these
designs to 100-110 lb·in (11.3-12.4 Nm).
For bikes equipped with air shocks, start with a pressure in PSI of 20-25% more than your
body weight in pounds (or KG x 0.15 in ATM). Note the pressure on the
pump gauge and try different settings at 10-15 PSI (0.7-1 ATM) intervals to
fine tune the bike to the correct sag, or your preference.
On some models of shocks, the damping range is adjustable to control
the speed of the spring. Read your shock owner's manual to learn more
about damping adjustments.
Figure 85
Tighten shock mounting bolts to 61-75 lb·in (6.9-8.5 Nm). Tighten linkage
attachment bolts to 15-20 lb·in (1.7-2.2 Nm). Tighten the pivot bolt on the
left side of the bike to 100-110 lb·in (11.3-12.4 Nm).
For bikes equipped with air shocks, start with a pressure in PSI of 20-
25% more than your body weight in pounds (or KG x 0.15 in ATM). Note the
pressure on the pump gauge and try different settings at 10-15 PSI (0.7-1
ATM) intervals to fine tune the bike to the correct sag, or your preference.
On some models of shocks, the damping range is adjustable to control
the speed of the spring. Read your shock owner's manual to learn more
about damping adjustments.
This model offers an adjustable shock compression ratio. This allows you
to change the rate of shock compression as the rear wheel goes through its
range of travel. This is done by moving the lower (rear) shock mount to one
of its selection of compression adjustment mounting holes (Fig. 85). After
making such adjustment, follow the Inspection procedures in this section to
make sure your bike is operating properly.
(continued next page)
29
Introduction
If your bicycle is equipped with a suspension fork, ensure that it is
operating properly before every ride. Read the Suspension Fork
Owner's Manual you received with your bike. If you did not receive a
fork manual, get one from your dealer, or contact us and we'll send
you one. The following information is only meant to supplement the
fork manufacturer's manual.
Inspection
Suspension forks require regular care, maintenance, and lubrication. All
bolts must be tight, and critical clearances must be maintained.
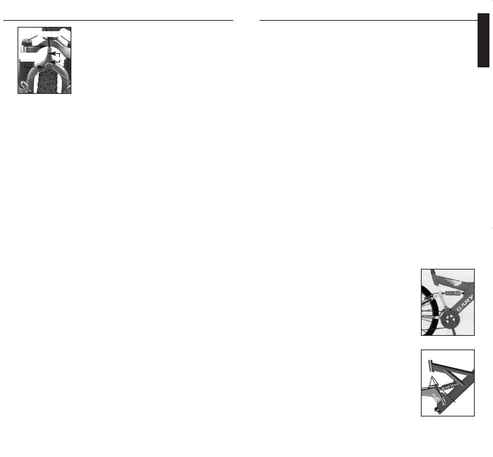
For bikes with cantilever brakes, there must be a minimum of 1 inch (25
mm) between the straddlewire carrier and the front brake cable housing
stop on the brake arch (Fig. 83). Using the brake lever barrel adjuster will effect the brake cable
length, changing this distance.
After every 5-10 hours of riding, or after riding in extremely wet and muddy conditions, lift
the shock boots and inspect and clean the seal area. Remove all dirt and clean the entire area
with a soft cloth. Do not use solvents or other cleaning agents which may degrade the
suspension lubrication. Make sure the boots are in the correct position to protect the seals and
keep contaminants from damaging the fork.
Tighten crown pinch bolts as specified in the Suspension Fork Owner's Manual supplied with
your suspension fork.
Do not ride with less than the minimum clearances between the top of the tire and the
bottom of the fork crown. Minimum clearance for your fork is listed in the Suspension Fork
Owner's Manual supplied with your suspension fork.
Adjustment
The stiffness of the suspension fork spring, also called the preload, may be adjustable. For
starters, adjust your suspension fork so that the fork sags (compresses when you sit on the
bike in a normal riding position) about 5-10mm, or 10-20mm for long travel forks with over
65mm of travel. After first riding with this adjustment, try different adjustments to suit your
riding style.
To increase preload of your suspension fork, follow the instructions in the Suspension Fork
Owner's Manual supplied with your suspension fork.
Damping controls the speed of the suspension fork action during compression or rebound. On
some forks either the compression or rebound damping, or both, may be adjustable. To make
these adjustments, follow the instructions in the Suspension Fork Owner's Manual supplied with
your suspension fork.
Changing your suspension will affect handling and braking characteristics. After making a
change, carefully test the bike in a low traffic area until you are familiar with its performance.
Lubrication
Suspension forks require regular lubrication to work smoothly and to provide long seal life.
Follow the Lubrication and Maintenance instructions in the Suspension Fork Owner's Manual
supplied with your suspension fork.
28
SUSPENSION FORKS
Fig. 83
Fig. 84
Fig. 85
REAR SUSPENSION
Tire
clearance
25mm
Preload adjusters
Linkage bolts
Compression
adjustment
ENGLISH