Schraeder and Presta Valves
There are two styles of valves used on bicycles (Fig. 77). The
larger diameter Schraeder valve is similar to those found on cars
and it's use is the same. Just remove the valve cap, attach an air
pump with a Schraeder fitting, and inflate. Put the cap back on, as
the cap keeps dirt and debris out of the valve.
The Presta valve is also known as a French valve. To inflate a
Presta valve, remove the valve cap, if present. Presta valves seal
very tightly, and require a lot of pressure to open them initially, so
after unscrewing the valve nut, depress the nut with your finger to
open the valve (this should let a little air out). Inflate using a Presta valve fitting. After inflation,
tighten the valve nut against the valve stem until finger-tight. This provides the same function
as the valve cap on a Schraeder valve.
Follow these steps when repairing a tube in the event of a flat tire, or
when replacing a worn tire.
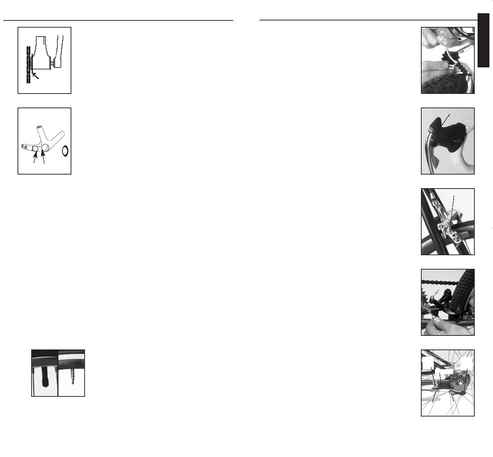
1. For direct-pull brakes, disconnect the link arm from the curved pipe
(Fig. 78). For cantilever or U-brakes (Fig. 81), disengage the brake by
removing the link-wire from the brake caliper. For caliper type brakes (Fig.
80) flip the quick release lever. For Campagnolo Ergopower, press the quick
release on the lever (Fig. 79). The brake caliper will spring back allowing
the tire to pass between the brake pads.
Note: If you are removing the rear wheel, shift the chain to the smallest chainwheel and the
smallest cog of the cassette. For bikes with coaster brakes, undo the brake arm strap from
the chainstay.
For Nexus 7 speed rear wheels, undo the brake and shift cables.
Be careful not to touch the rear hub which may be hot from braking.
Release the brake cable by pressing the cable carrier arm (Fig. 82)
forward and the cable clamp bolt rearward so that the bolt aligns
with the carrier's larger diameter hole, then pull outward to
disengage the cable clamp bolt. Slide the brake cable stop forward to
remove it from the brake arm. To release the shift cable, first put the
shifter in 1st gear. Pull the cable's housing out of the shift cable
housing stop. Rotate the shift cable fixing bolt until the washer flats
align with the slit in the cog joint bracket, and remove the cable.
2. For wheels with quick release devices, release the quick release lever
and for front wheels unscrew the quick release adjustment nut 3 full turns.
Remove the wheel from the fork tips.
For wheels with axle nuts, gradually loosen the nut on alternate sides
of the hub. This prevents altering the bearing adjustment of the hub.
Note: For the rear wheel on bikes with a derailleur, hold the rear derailleur up and back while
removing the wheel. For rear wheels on bikes without rear derailleur, slide the wheel forward
and lift the chain off the rear cog. Then remove the wheel.
3. Deflate the tire completely. Remove the tire from the rim with your hands or
tire lever tools. Do not use sharp objects such as a screwdriver to remove the tire.
4. If you are repairing a tube leak, repair the puncture on the tube with a
tube patch, or replace the tube. Check the inside of the tire and rim to be
sure there are no foreign objects protruding through or stuck to the
insides. Make sure the rim strip covers all of the spoke heads. Inspect the
tire for wear, and any other damage. If a tire has any cuts or separations
which go through the tire, making any part of the inner tube visible, or if
any part of the tire casing, such as threads or other material, shows
through the tire tread (running surface) replace the tire.
5. If you are replacing the tube or tire, make sure the new tube or tire is
the same size as the old one, or check with your dealer for compatibility of
differing sizes. The size can be found on the side of the tire.
6. Inflate the tube until it begins to take shape. Place the tube in the tire.
Insert the tube valve stem through the hole in the rim and carefully mount
the tire onto the rim using your hands. Be careful not to pinch the tube
between the rim and the tire when mounting the tire.
7. Inflate the tire to about half pressure while checking that the tire bead
is properly seated in the rim. Deflate the tire again. This will help avoid any
pinching of the tube.
8. Inflate the tire to the pressure indicated on the side of the tire. Place
the wheel back in the frame making sure that the axle is inserted all the
way into the fork tips.
Note: For the rear wheel on derailleur bikes, place the chain on the smallest cog when installing
the wheel. For rear wheel on bikes without a derailleur, slide the wheel fully forward and place
the chain over the cog. For disc brakes, align the rotor disc with the brake.
9. Re-install and adjust the quick release or tighten the axle nuts as
shown in the Wheels section.
For single speed bikes, retension the chain (with the chain
tensioners, if so equipped). Also readjust training wheels and
reinstall the coaster brake arm strap, if so equipped. Center the
wheel in the frame, and gradually tighten the axle nuts on
alternating sides of the hub. Tighten the brake strap bolt.
To install the brake cable on a Nexus rear hub, slide the brake
cable housing stop into the slot on the brake arm. Pull the cable back
and press the cable carrier arm forward until the cable clamp bolt
can be inserted though the large diameter hole. Slide the bolt
forward into the smaller diameter hole and make sure it is properly
engaged so that it cannot come out.
To install the shift cable on Shimano Nexus rear hubs, align the
washer flats of the shift cable fixing bolt with the slit in the cog joint
bracket, and with the cable towards the center of the hub, slide in
the bolt. Wrap the cable counterclockwise around the cog joint
bracket, lay the cable in the fork, and pull the housing until there is
enough slack to install the housing into the housing stop. Check that
the gear cable tension is correctly adjusted.
10. For bikes with hand brakes, re-install the brake link-wire, direct pull
connecting link, or close the brake quick release.
11. Test the brake to make sure it is properly adjusted.
12. Spin the wheel to see that it is centered and the wheel turns freely without rubbing.
27
Aluminum, carbon fiber, and the aluminum parts of your bicycle (like
dropouts) are not as ductile as steel. Attempting to make adjustments to a
part by bending or twisting it poses a risk of breaking it. Readjustment of
frame alignment is not recommended. If the frame has been damaged,
bring it to your dealer so it can be sent to the factory for repair.
Tolerances for press fits and thread fits are critical. Never press a part
which is too large or misaligned as this may break the frame or part. Over-
torquing a threaded fastener may ruin the threads or break the part. Be
sure bottom bracket and rear derailleur threads are clean and well greased
before insertion. Start threads by hand, not with a wrench. Tighten bottom
bracket cups to 430-610 lb·in (48.6-68.9 Nm). Tighten rear derailleur
attachment bolts to 70-85 lb·in (7.9-9.6 Nm). For water bottle mounting
screws, CCD screws, or rear rack and fender mounting screws, the correct
torque is 20-25 lb·in (2.3-2.8 Nm). Do not tighten the front derailleur
clamp bolt more than 20 lb·in (2.3 Nm) to avoid damaging the derailleur
or frame.
Your frameset is designed to accept seat posts with 27.12 to 27.20 mm
or 31.45 to 31.60 mm outer diameter. Measure the seatpost for conformity
to this tolerance prior to installation. With aluminum frames, use adequate
lubrication to prevent seizing of the aluminum seatpost to the aluminum
seat lug or tube.
Inside the seat lug of an OCLV frame a thin layer of fiberglass acts as an
insulator to prevent corrosion. This prevents the carbon fiber from
contacting the aluminum of the seatpost, so no lubrication is required, nor
is it recommended.
OCLV road frames must always be fitted with a chainstay guard (Fig. 76)
and a chainkeeper (Fig. 75, not required on Y Foil frames) to protect
against damage in case of chainsuck or overshifting past the inner
chainring. Make sure the chainkeeper and chainstay guard pieces are
installed correctly and maintained in good condition at all times. Should they become dislodged
or damaged, see your dealer to have new ones installed right away.
When cleaning frame parts, do not use solvents, harsh chemicals, or abrasive cleaners
(including some waxes). Remove road film with a soft rag and a mild detergent and water
solution. Use of industrial solvents for cleaning or paint removal may damage the paint. Also,
some energy enhancing drinks may harm the paint.
Avoid clamping your bicycle frame in repair stands or racks used to carry bikes on cars.
Mechanical clamping devices have a great deal of leverage which can easily crush, dent, or in
other ways damage your bicycle's lightweight tubing. With repair stands, clamp the seatpost.
With bike racks, clamp the fork tips.
Excessive heat, such as that used in powder coating, or any open flame, may damage the
adhesive which joins the frame parts. Do not exceed 160º F. (71º C.) exposure to your frame.
Removing paint from any frameset requires special techniques and great care. Harsh
abrasives will remove frame material, possibly weakening the bicycle. See your dealer for more
information.
Modifying the frame or fork in any way will void the manufacturers warranty and may be
unsafe.
For Klein frames, a minimum of 4 inches (100 mm) of seatpost must be inserted in the frame
as explained on page 15. On some seatposts, the minimum insertion mark is determined by
using a calculation of 2.5 x seatpost diameter. This does not result in sufficient seatpost
insertion for Klein frames. If you are uncertain, measure the mark on your seatpost.
Frame Repair
Most types of frame damage can be repaired at the factory. You must send your frame back
to the factory through an authorized dealer.
26
CARE OF YOUR ALUMINUM OR CARBON FRAME OR FORK
Fig. 75
Fig. 76
TIRE INSTALLATION
Fig. 78
Fig. 80
Fig. 81
Fig. 82
Fig. 77
Fig. 79
Chainkeeper
Chainstay guard
Section
view
24mm
Quick release
Quick release
Brake
strap
bolt
Housing
stop
Brake arm
Cable
carrier
arm
Cable clamp
bolt
ENGLISH