ENGLISH
Introduction
The brake system allows you to control the speed of your bicycle, and this function is critical
to your safety. The brake system can be difficult to adjust properly without the proper tools and
training. If you are unsure of the brake adjustment, or suspect any problem, do not ride your
bicycle. Take your bicycle to your dealer for service. It is strongly recommended that
adjustment of critical components such as brakes be done by your dealer. If you need more
specific information regarding your brake system, contact your dealer.
Inspection
Before every ride make sure your brakes are working properly.
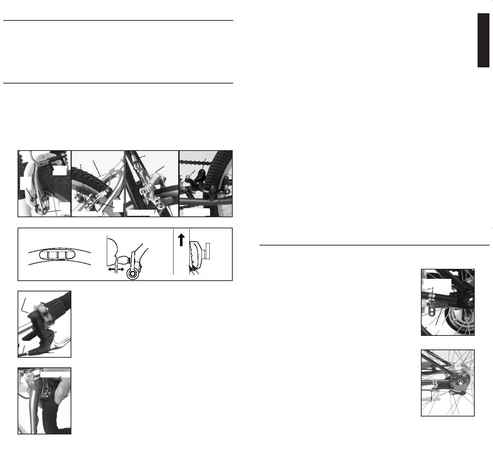
Before every ride check that the brake pads are in proper position (Fig. 55). Your rims are
part of the braking system, so keep them clean at all times. Check that there is no oil, grease,
or other dirt on the rims.
Every month check your bike's brake cables and housing. Check the cables for kinks, rust,
broken strands, and frayed ends. Check the housing for bent ends, cuts, stretched coils, and
wear. Replace any part of your brake cables or housing which do not pass inspection.
Every month, inspect your brake pads for wear. Brake pads have shallow grooves in their
braking surfaces to channel water from the rim. If any of these grooves are less than 2 mm
deep (or 1 mm deep for direct-pull brakes, Fig. 51), replace the pads.
Every 3 months for road caliper brakes (Fig. 53) tighten pad fixing bolts
to 40-60 lb·in (4.5-6.8 Nm). Tighten caliper fixing bolts to 70-85 lb·in
(7.9-9.6 Nm).
Every 3 months for direct pull brakes (Fig. 51), cantilever brakes (Fig.
52), or U-brakes (Fig. 54) tighten pad fixing bolts to 70-80 lb·in (7.9-9
Nm). Tighten arm fixing bolts to 70-85 lb·in (7.9-9.6 Nm).
Every 3 months tighten lever clamp bolts (Figs. 56 and 57) to 40-60
lb·in (4.5-6.8 Nm).
Adjustment
Adjust the brake pads so they are 1.5 mm to 2 mm away from the rim
when the brakes are not applied. This is done by turning the brake cable
adjusting barrels on the brake calipers (or brake levers if equipped with
direct pull brakes). To bring the pads closer to the rims, turn the adjusting
barrel counter-clockwise. To move the pads away from the rim, turn the
adjusting barrel clockwise.
If the pads of direct-pull or caliper brakes cannot be adjusted close
enough to the rim in this manner, loosen the cable anchor bolt until the
cable is loose. Screw the barrel adjuster all the way in clockwise. Hold the
brake pads against the rim, and re-tighten as in Inspection. Changing the
brake cable length in a cantilever brake requires special tools and training,
so should only be done by your dealer.
To adjust the alignment of the brake pads, loosen the brake pad fixing
bolt and align the pad so that the pad surface and the rim surface meet
correctly (Fig. 55). The toe-in shown in Figure 55 is to prevent squealing
of the brakes. It may not be necessary to toe in used brake pads, or some
new direct pull or V type brakes.
When adjustment is complete, tighten the pad fixing bolt to 70-80 lb·in.
(7.9-9 Nm). To center the brakes, rotate the centering screw (Figs. 52-53).
21
20
BRAKE SYSTEMS
RIM BRAKES
Fig. 51
Fig. 54
Fig. 52
Fig. 53
Fig. 55
Fig. 56
Fig. 57
After the brakes are adjusted, test the brakes by applying maximum braking force to the levers.
Ensure that the cable does not slip, that the pads close toward the rim at right angles, and that
the pads do not contact the tire.
If you are unsure of the brake adjustment, or suspect any problem, do not ride your bicycle.
Take your bicycle to your dealer for service. It is strongly recommended that adjustment of
critical components such as brakes be done by your dealer.
Lubrication
Every 3 months, lubricate your brake lever pivots and brake arm fixing pivots with a light oil.
See your dealer for a recommended oil.
Lubricate brake cables with a thin layer of Wrench Force® synthetic grease or a similar
lubricant when installed.
Cable Installation
To install a brake cable in a direct-pull or caliper-type brake, note the path of the old cable,
loosen the brake cable anchor bolt and remove the worn cable. Turn the adjusting barrel on the
brake caliper clockwise so that the threads on the adjusting barrel are not exposed above the
caliper. Grease the new cable and reinstall, feeding it along the same path as the old cable.
Make sure that the cable's leaded end is seated properly in the brake lever body and that the
housing is properly seated in the lever. After threading the cable through the anchor bolt, follow
the directions for brake adjustment in the Inspection and Adjustment sections. Finally, cut the
cable so that no more than 2 inches (51 mm) extends beyond the anchor bolt. Crimp a metal cap
or place a bit of solder on the end of the cable to prevent fraying.
Installing a brake cable in a cantilever brake requires special tools and training, so should only
be done by your dealer.
Direct-pull Brake Levers
Direct-pull brakes (Fig. 51) have increased leverage and stopping power, and use special brake
levers to manage that power. With all brakes use only levers recognized as compatible, like
those supplied with your bike.
If your direct-pull brake levers offer adjustable braking force, read and follow the
manufacturers instructions supplied with your bike before making any such adjustment. Like
any braking system, failure to properly use and maintain your direct-pull braking system can
result in a loss of control and injury.
COASTER AND INTERNAL BRAKES
Inspection- Coaster Brakes
Before every ride check that the brake is working properly by pedaling backwards. The brakes
should engage with less than 60 degrees backwards rotation of the cranks
(1/6 revolution). If your brakes do not firmly engage, take your bike to your
dealer for service.
If you are unsure of the brake operation, or suspect any problem, do not
ride your bicycle. Take your bicycle to your dealer for service. It is strongly
recommended that adjustment of critical components such as brakes be
done by your dealer.
Once a week check that the brake strap attachment bolt is tight and that
the brake strap is securely fastened to the chainstay (Fig. 58).
Inspection- Inter-M Roller Brake
Before every ride, make sure the Nexus Inter-M roller brake (Fig. 59) is
working properly. After about 15mm of brake lever movement, the brakes
should engage enough to stop the bike.
Adjustment- Inter-M Brake
To decrease the amount of lever travel necessary to engage the brakes,
loosen the barrel adjuster locknut, and rotate the brake cable barrel
adjuster (Fig. 59) counterclockwise. To increase lever travel, rotate the
barrel adjuster clockwise. Test the lever for correct travel. When the
desired setting is achieved, rotate the barrel adjuster locknut clockwise
until finger tight to hold this adjustment.
Lubrication
Every 3 months, lubricate your brake lever pivots with Wrench Force®
synthetic chain lube or a similar light oil.
Lubricate brake cables with a thin layer of Wrench Force® synthetic
grease or a similar lubricant when installed.
Fig. 58
Fig. 59
Pad and rim should
be parallel
Brake pad aligned with
the rim surface
Direction of rim
rotation
0.5 - 1mm toe in
No
contact
Arm
fixing
bolt
Pad
fixing
bolt
Pad
fixing
bolt
Arm
fixing
bolt
Linkwire
Centering screw
Centering screw
Pad fixing bolt
Barrel adjuster
Pad fixing bolt
Arm fixing bolt
Lever clamp bolt
Reach
adjustment
screw
Cable
Barrel
adjuster
Lever clamp bolt
Brake strap
Brake strap
attachment bolt
Barrel adjuster