To make the high gear adjustment on the front derailleur, shift the rear
derailleur to the smallest cog. Next, turn the high gear adjusting screw on
the front derailleur (usually marked "H") counter-clockwise until the screw
cannot interfere with the motion of the derailleur. While pedaling the
bicycle with your hand, carefully shift onto the outside chainring. Position
the front derailleur with the left shifter so that the outer chain guide of the
front derailleur is approximately 0.5 mm from the chain. Re-tighten the
high gear adjusting screw until it meets resistance. If you have turned it
too far, the front derailleur will move toward the smaller chainring.
Right Shifter/Rear Derailleur
To make the high gear adjustment on the rear derailleur, shift the chain
onto the largest front chainring and smallest rear cog, then loosen the rear
derailleur cable clamp bolt until the cable is free.
Stand behind the bicycle to see that the rear cog, the chain, and the two
derailleur pulleys are in line. If they are not aligned, turn the high gear
adjusting screw, usually marked "H" until this line is established. While
pulling on the rear derailleur cable, shift the right shifter fully to the small
cog position. Screw the adjusting barrel on the frame or shifter to it's most
clockwise position. Screw the adjusting barrel on the rear derailleur to it's
most clockwise position, and then rotate it one turn counter-clockwise. Pull
the shift cable taut, insert the cable into the clamp bolt groove on the rear
derailleur, and tighten the cable clamp bolt to 32-52 lb·in (3.6-5.9 Nm).
To make the low gear adjustment on the rear derailleur, first turn the low
gear adjusting screw on the rear derailleur (usually marked "L") far enough
counter-clockwise so that it will not restrict the movement of the derailleur.
While pedaling the bicycle with your hand, carefully shift the chain onto the
smallest front chainring and the largest rear cog. Do not over-shift the rear
derailleur, or the chain may wedge between the large cog and the spokes.
Position the rear derailleur pulleys in line with the largest cog. Turn the low gear adjusting
screw clockwise until it meets resistance. If you have turned it too far, the derailleur will move
toward the outside of the bicycle. Go through the various gear combinations. Make sure the
chain does not fall off when you shift.
To align the indexing system of your rear derailleur, shift the chain onto the largest front
chainring, and the smallest rear cog. Shift the chain onto the next cog. If the chain makes
excessive noise or does not shift, rotate the rear derailleur barrel adjuster counter-clockwise
(increasing cable tension) to align the derailleur pulleys with this second cog. Do this in small
increments, until the system shifts smoothly and quietly. If making this adjustment makes the
chain shift to the third cog, derailleur cable tension is too great. Rotate the barrel adjuster
clockwise until the derailleur pulleys and the second cog is aligned. Go through the various gear
combinations to ensure that the chain smoothly lines up with all the rear cogs.
To adjust the middle position of the front shifter (where this feature is available), shift the
chain onto the middle front chainring and the largest rear cog. Use the barrel adjuster on the
front shifter to position the inner chain guide of the front derailleur approximately 0.5 mm from
the chain. Go through the various gear combinations. Make sure the chain does not fall off when
you shift and that the front derailleur does not rub on any part of the crankset.
If the cable of either derailleur fails the previous inspection, do not ride the bicycle until the
cable has been replaced. To do this, either follow these instructions or take your bicycle to your
dealer for service. To replace a shift cable, shift the derailleurs so that the chain is on the
smallest front chainring and the smallest rear cog. Note the path the derailleur cable follows,
loosen the derailleur cable clamp bolt holding the bad cable, and remove the cable through the
shifter. Inspect the housings. If they are damaged or rusty, replace them as well. If you replace
any housings, make sure that the pieces are cut to proper length and of the correct type of
housing (use the old pieces as guides) and that the housing ends are free of burrs; the cable
should pass freely through these ends. Apply Wrench Force® synthetic grease or similar
lubricant to the new cable and feed it through the shifter and all of the cable guides and
housings, and the cable clamp following the same path as the old cable. After you have done
this, follow the directions for derailleur adjustment and cut the cable so no more than 2 inches
(51 mm) of cable length extends beyond the cable clamp bolt. To prevent fraying of the cable
end, crimp on a metal cap or apply some solder to the end of the cable.
Lubrication
Every month, lubricate all pivot points on both the front and rear derailleurs, including the
derailleur pulleys on the rear derailleur, with Wrench Force® synthetic chain lube or similar
lubrication. Lubricate shift cables whenever they are being replaced. Follow the instructions for
shift cable replacement in the following information.
Introduction
Some bikes are equipped with a derailleur system. This system consists
of those parts of the bicycle which allow you to shift gears. The derailleur
system includes the front and rear derailleurs, the shifters or shift levers,
and the shift cables.
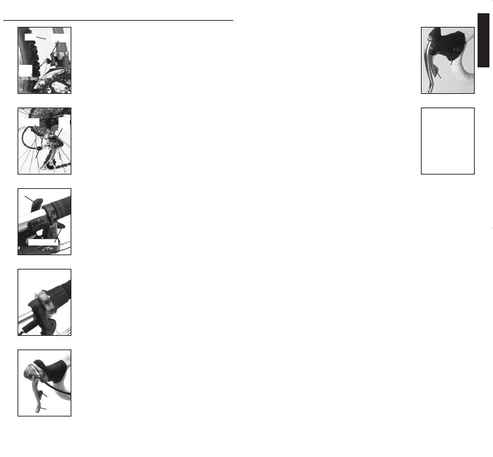
The different types of shifters covered here are Shimano RapidFire or
E-Z Fire shifters (Fig. 46), GripShift shifters (Fig. 47), Shimano STI road
shifters (Fig. 48), Campagnolo Ergopower shifters (Fig. 49), and Bar-con
shifters (Fig. 50).
Shifting Pointers (all systems)
When shifting gears on a bicycle, plan ahead. Shift gears only when the
pedals and chain are moving forward. Never attempt to shift gears when
stopped or back pedaling. When you shift, reduce your pressure on the
pedals. Excessive chain tension makes shifting difficult. Avoid shifting
when going over railroad tracks or bumpy surfaces. The chain may not
shift properly or may fall off.
The left-hand shifter controls the front derailleur and the right-hand
shifter controls the rear derailleur. Shift only one lever or shifter at a time.
Choose the gear combination most comfortable for riding conditions. You
should be able to maintain a constant rate of pedaling. It is not essential
that various gear combinations be used in sequence.
Listen to your bike. A properly adjusted drivetrain and derailleur system
is quiet. If an unusual noise follows any shift, your derailleur cable may
need to be adjusted slightly. If, after adjustment, the noise persists or
grows louder, stop the bicycle and try to locate the noise. If necessary, ask
your dealer to identify and correct any problems. For more information
about your derailleur system read the following information or see your
dealer.
Inspection
Once a month, check the shift cables for kinks, rust, broken strands,
or frayed ends. Also check the housing for bent ends, cuts, and wear. If
you suspect a problem with your shift cables, do not ride your bicycle.
Replace the cable and/or housing before riding your bicycle by
following the instructions covering adjustment, or take your bicycle to
your dealer for service.
Once a month, check the operation of the left shifter/front derailleur.
When the large left shift lever is pushed (or the top of the left twist shifter
is rotated to the back, or the single bar-con lever (Fig. 50) is pulled back)
the front derailleur should shift the chain from a smaller to a larger
chainring. When the small left shift lever is pushed (or the top of the left
twist shifter is rotated forward, or the single bar-con lever (Fig. 50) is
pushed forward), the derailleur should shift the chain from a larger to a
smaller chainring. The chain should not fall off the inner or outer
chainrings at any time.
Once a month, check the operation of the right shifter/rear derailleur.
When the large right shift lever is pushed (or the top of the right twist
shifter is rotated to the back, or the single bar-con lever (Fig. 50) is pulled
back), the rear derailleur should shift the chain from a smaller to a larger
cog. When the small right shift lever is pushed (or the top of the right
twist shifter is rotated forward, or the single bar-con lever (Fig. 50) is
pushed forward) the derailleur should shift the chain from a larger to a
smaller cog. After the shift, the rear derailleur should be positioned such
that it does not rub on the chain. The chain should not fall off the inner or
outer cogs at any time.
Adjustment
Left Shifter/Front Derailleur
To make the low gear adjustment on the front derailleur, first shift the
chain onto the smallest front chainring and the largest cassette cog.
Loosen the derailleur cable clamp bolt until the cable is free. Turn the low
gear adjusting screw (usually marked "L") until the inner chain guide of
the derailleur is approximately 0.5 mm from the chain. While pulling on the
front derailleur cable, shift the left shifter completely to its small chainring
position. Screw the left adjusting barrel found on the shifter or the frame
to its most clockwise position. Pull the front derailleur cable taut, insert
the cable in the groove found above the derailleur cable clamp bolt, and
tighten the cable clamp bolt to 32-52 lb·in (3.6-5.9 Nm).
19
18
DERAILLEUR SYSTEM
Fig. 44
Fig. 45
Fig. 46
Fig. 47
Fig. 48
Fig. 49
Fig. 50
Bar-con
Cable
Adjusting
screws
Cable
clamp
bolt
Adjusting
screws
Cable
Cable
clamp
bolt
Adjusting
barrel
Large lever
Small lever
Large lever
Small lever
Large lever
Small lever
ENGLISH