Try Timesavers Premium 2-Day Blue Label Service
For orders call 1-800-552-1520 or 480-483-3711 · E-Mail: info @timesavers.com
Prices and descriptions are subject to change without notice.
158
The Golden Hour Clock Co.
7745 E. Redfi eld Road #500
Scottsdale, AZ 85260 U.S.A.
480-483-3711
clocks@timesavers.com
www.timesavers.com
Golden Hour Repair Tips
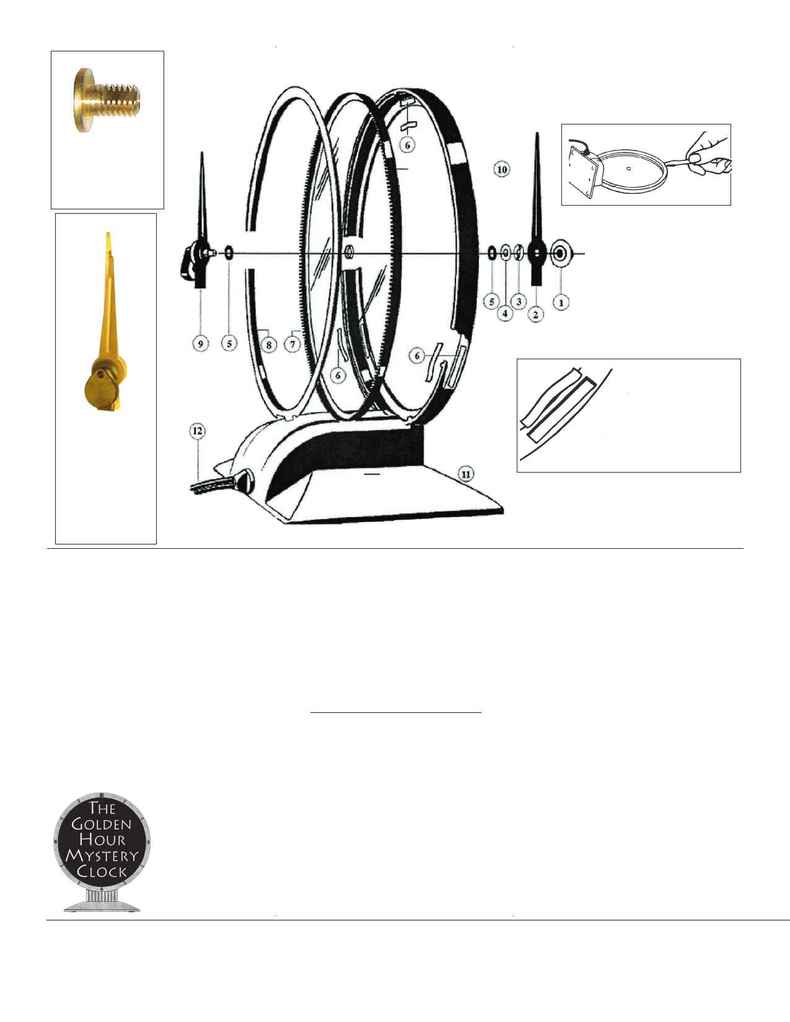
Parts List
1 Cone Nut
2 Minute Hand
3 Convex Tension Washer (1)
4 Flat Washer (1)
5 Fiber Washers (2)
6 Leaf Springs (3)
7 Glass And Gear Ring
8 Gold Retaining Ring
9 Hour Hand Assembly
10 Gold Dial Ring
11 Gold Base
12 Cord And Grommet
Golden Hour Repair Tip
If your Golden Hour clock runs fast
or slow after replacing the motor,
check to see if the glass is loose in
the gear ring. The glass and gear
ring were originally assembled with
an adhesive and cured in an oven.
Over the years the environment
tends to break down this adhesive
and the glass loosens from the metal
gear ring. Installation of a new glass
and gear ring assembly will elimi-
nate this problem.
Dont forget to reinstall the three
leaf springs in the dial frame before
installing the glass and gear ring.
To Put Together
1.
Make sure all three leaf springs (6) are
in their proper position. See Detail C above.
Then slip in crystal glass and gear ring assem-
bly (7) into place.
2.
Put one fi ber washer (5) on hour hand as-
sembly (9) and place it through the hole in the
glass and gear ring (7) at the 12 oclock
position.
3.
Then place a fi ber washer (5), fl at washer
(4), convex washer (3), and the minute hand
(2), on the hand shaft. Line the minute hand
(2) up with the hour hand assembly (9) at the
12 oclock position and screw the cone nut (1)
into place. Align the hour and minute hands
before tightening the cone nut on the crystal.
4.
Place the clock on a fl at surface and adjust
the hands to the 12 oclock position. To set
clock, move the minute hand clockwise to the
correct minute and fl ip the hour hand to the
correct hour.
To Take Apart
1.
Set both hands to the 12 oclock position.
Unscrew cone nut (1) at the front, minute hand
(2), convex washer (3), fl at washer (4), and
one fl at fi ber washer (5), will come off in that
order.
2.
Hour hand assembly (9) removes from the
back. Then remove one fi ber washer (5).
3.
Place clock on its face and remove gold re-
taining ring (8) from the back by prying gently
with a screwdriver at the top. See "Detail D".
4.
Remove entire crystal glass and gear ring
(7). Remove the three small leaf springs (6) to
prevent loss.
Detail A
Hour hand and
counterbalance are
together in one
assembly. Its
important that tear
drop counterweight
is aligned as shown
above when
replacing hour hand
in crystal face
.
Detail C
Three leaf springs fi t into pockets
provided in the gold ring. Springs
must be in place to provide proper
tension to crystal.
Detail D
Detail B
Main stem is beveled
fl at on two sides for
precise fi t of minute
hand. This ensures
greater time keeping
accuracy.
