Viewing Notch
Coronado Locking Insert (5519)
Installing the Coronado Locking Insert
Thank you for purchasing this locking insert accessory for your premium Coronado Mailbox. This is a retrofit
accessory that provides your existing mailbox with a locking door feature - please follow the instructions carefully
to properly install the insert for problem free service. If you have any questions about how to install or use this
accessory, or if you need any replacement parts, please call us directly at (800) 464-7491 or contact us at
www.architecturalmailboxes.com.
A
RCHITECTURAL
M
AILBOXES
1707 E. Del Amo Blvd., Carson, CA 90746 (800) 464-7491
© 2005, Architectural Mailboxes
1
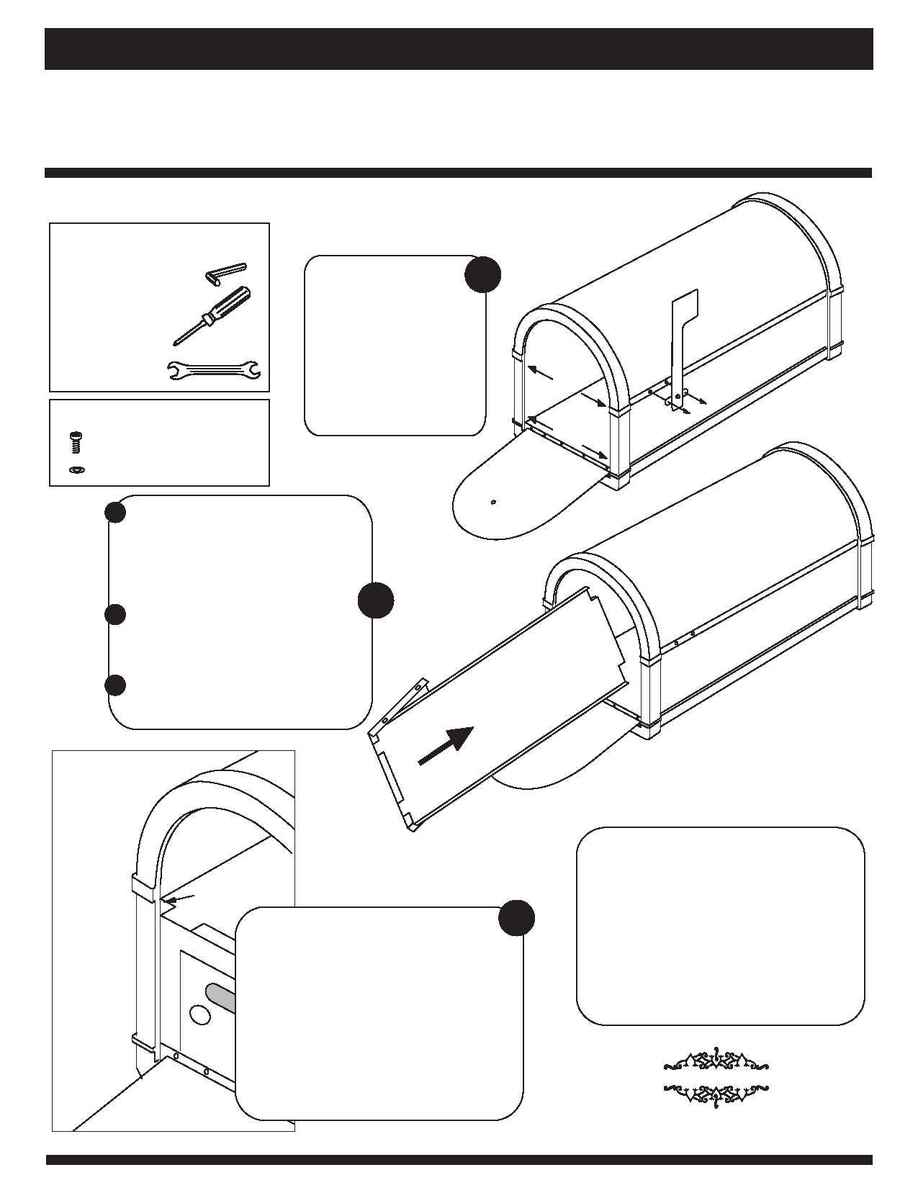
Using a Phillips Head
screwdriver, remove the 4
screws at locations A and B at
right that attach the front frame
to the mailbox body.
To provide more clearance
inside the mailbox, remove the
flag by unscrewing the two
nuts on the inside of the
mailbox.
Tools
Phillips head screwdriver
Allen wrench (included)
Hardware
(included)
x 4, Allen screws
2
Insert the Coronado Locking Insert into the
mailbox exactly as shown at right, with the
top of the Insert facing right and the Insert
completely folded. You will need to angle
the Insert to fit it through the mailbox
frame.
After inserting the accessory, unfold the
rear and front panels. The rear panel is
spring-loaded so it will unfold automatically
when you let it go.
Line up the holes on the sides of the front
panel with the holes in the body/frame from
Step 1.
a
b
c
3
Using the four included Allen head screws and
washers, and the included Allen wrench, attach
the Insert to the frame and body at the four A and
B locations identified in Step 1. To help find the
screw holes at the A locations, you can look
through the viewing notches. Partially insert all
four screws before tightening them.
BE SURE NOT TO OVERTIGHTEN THESE
SCREWS - ONLY TIGHTEN THEM UNTIL THEY
ARE SNUG.
Reattach the flag.
Using the Insert
The mail carrier will insert the incoming mail
through the slot.
To access delivered mail, simply open the mail
access door using the included keys.
Place your outgoing mail on the shelf created by
the Locking Insert top panel. Don't forget to raise
your flag so the carrier knows you have outgoing
mail.
A
B
REV052305
x 4, washers
Small wrench for
removing flag
